Kay Wheeler Moore

Welcome to my blog

Hello. . .

The Newfangled Country Gardener is for anyone who has a garden, would like to have a garden, or who simply enjoys eating the garden-fresh way. I don't claim to be an expert; in this blog I'm simply sharing some of the experiences my husband and I have in preparing food that is home-grown.

About the author

Kay Wheeler Moore is the author of a new cookbook, Way Back in the Country Garden, that features six generations of recipes that call for ingredients that are fresh from the garden. With home gardening surging in popularity as frugal people become more resourceful, this recipe collection and the stories that accompany it ideally will inspire others to cook the garden-fresh way and to preserve their own family food stories as well. The stories in this book center around the Three Red-Haired Miller Girls (Kay's mother and aunts) who grew up in Delta County, TX, with their own backyard garden so lavish that they felt as though they were royalty after their Mama wielded her kitchen magic on all that was homegrown. Introduced in Kay's previous book, Way Back in the Country, the lively Miller Girls again draw readers into their growing-up world, in which a stringent economic era--not unlike today's tight times--saw people turn to the earth to put food on the table for their loved ones. The rollicking yarns (all with recipes attached) have love, family, and faith as common denominators and show how food evocatively bonds us to our life experiences.

Friday, July 29, 2011

A berry, berry nice Berry Sauce makes great topping for ice cream

Remedy for a hot, 105-degree summer night: ice cream (sugar-free, of course) with a smooth topping of Berry Sauce. Delicious all the way down; the berries (combination of raspberries and blackberries in a thick, sweet sauce) are healthy and the topping wonderful.

“Celebrating a Healthy Harvest” furnished this recipe and suggested it could be used atop ice cream, biscuits, or shortcake. Hubby immediately began asking whether this could be served on toast or whether it had to be confined to ice cream (not that that would bother him, Mr. Ice Cream Man himself).

I combined the two berries (our grocery has oodles of both varieties right now; they’re on sale) to make the sauce, which keeps well in the fridge. Anything (especially a welcome blessing like this ice-cream topper) that helps us get through these hot summer days is terrif.

Berry Sauce

1 cup sugar (or sugar substitute)
4 cups raspberries or blackberries or combination
1 tablespoons corn starch
3 tablespoons cool water

In a saucepan over medium-low heat cook berries and sugar until mixture is bubbly; simmer for 20 minutes. In a small cup mix together corn starch and water. Add slowly to berry mixture; stir gently. Simmer and stir until mixture begins to thicken. Remove from heat when the sauce is the desired thickness. Cool. Makes about 1 1/2 cups of sauce.


Thursday, July 28, 2011

Thanks to grocery circular for this citrusy summer meal idea

Hooray for the Kroger grocery circular for providing another spectacular recipe that yielded a tasty, ingenious summer meal for us. I never know where the next clever idea will crop up. The recent Kroger mailing showed me how to cook these Baked Chicken Tenders with Citrus Rice. Our homemade peach preserves, already blogged about, and the zest of an orange and a lemon tanged up some ordinary chicken strips and rice and made them memorable.

I like to get the chicken stock for the recipe by covering, in a saucepan, some chicken breasts in water and boiling until the chicken no longer is pink and is cooked through. This provides ample broth for the recipe instead of my having to use the canned varieties. Low-sodium chicken broth now is available, but it still has higher sodium levels than are best for me and Hubby. The whole-wheat bread crumbs used for dredging the chicken tenders are full of fiber and health. We pulled out some honey mustard for dipping sauce, but you also could use sweet chili sauce or even barbecue sauce.

The recipe makes oodles of rice that outlasts the supply of chicken tenders. Hubby just loves leftover rice for breakfast (sometimes he adds a little skim milk), so he was a happy camper for several days: first because he enjoyed the entrée recipe and then because he was amply supplied with breakfast rice well into the week.

Baked Chicken Tenders with Citrus Rice

1/2 cup honey
2 tablespoons apricot preserves (I subbed my own homemade peach preserves)
2 1/2 pounds skinless, boneless chicken breasts, cut into small strips
2 1/2 cups whole-wheat bread crumbs
4 cups chicken stock
2 cups brown rice, rinsed
1 orange and 1 lemon, zested
1 bottle citrus vinaigrette dressing (I used Maple Grove Farms of Vermont brand)
salt (or salt substitute) and pepper to taste

Preheat oven to 350 degrees. In a small bowl combine honey and preserves. Brush honey mixture on both sides of chicken; dredge chicken in bread crumbs. Place chicken on a baking sheet coated with nonstick cooking spray. Bake 20 minutes on each side until chicken is lightly browned. To make rice, over medium-high heat bring chicken stock to a boil. Cook rice in broth according to package instructions. Fluff the rice and place in a large serving bowl. Add orange zest and half the lemon zest. Toss well with 1/2 cup of the vinaigrette. Season with salt and pepper to taste. Garnish with remaining lemon zest. Refrigerate any leftovers. Serves 4 to 6.


Wednesday, July 27, 2011

No partridge, but Pear Cake with its chunks of fresh pears is super-yummy

Our pears are emerging by the basketfuls now. When we go out to pick them, we no longer bring in just a handful, but our little straw basket (that once sat on my mother’s hearth to contain her sewing projects and now is our gathering basket as we approach our garden) brims when we return. Usually, at that point, the pears are too hard to carve into, so for several days we house them in a plain brown paper bag until they ripen.

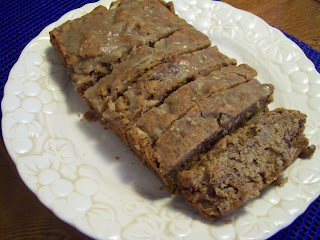
In my cookbook, Way Back in the Country Garden, I included a Pear Cake recipe that always has been a favorite. A neighbor’s gift of a sack of fresh pears from his farm once inspired me to find this recipe for this cake, which freezes extremely well. Now having pears from our own garden, I baked two loaves: one to serve recently when my brother- and sister-in-law visited and another to take with me as a hostess gift on our recent trip to Colorado.

The cake, with its 3 cups chopped pears, is hugely moist. The cinnamon, cloves, and allspice make it spicy and good. After I took the baked cake from its loaf pan, I poured an optional Brown-Sugar Pear Glaze atop it. The pear syrup for which the glaze recipe specifies I obtained by mashing a small amount of reserved pear slices until 2 tablespoons of pear puree formed. The cake is moist enough without the glaze, but I'll have to say that the glaze as a topping is a pure delight.

No partridge, but a wonderful pear tree that is giving us its beautiful gifts to enjoy ourselves and to share with others.

Pear Cake

3 cups chopped pears
2 cups sugar (or sugar substitute)
1 cup canola oil
3 cups all-purpose flour
2 eggs (or 1/2 cup egg substitute)
1 teaspoon cinnamon
1 teaspoon ground cloves
1 teaspoon ground allspice
2 teaspoons soda
1 teaspoon salt (or salt substitute)
1 cup pecans, chopped

Mix first three ingredients; let stand for one hour. Beat eggs and add them to pear mixture. Sift all dry ingredients together and add to pear mixture. Add chopped pecans. Pour into greased and floured tube pan or two loaf pans. Bake at 350 degrees for 1 hour. If desired prepare Brown-Sugar Pear Glaze (below) and pour on top of the loaves.

Brown-Sugar Pear Glaze

2 tablespoons butter
2 tablespoons pear syrup (can be obtained by mashing up a few pear slices until it forms a liquid puree)
1/4 cup brown sugar (or 1/8 cup brown-sugar substitute)
1/3 cup sifted powdered sugar

Melt butter; stir in pear syrup and brown sugar. Bring just to a boil. Stir in powdered sugar. Boil for 1 minute. Pour over Pear Cake loaves that have been removed from their baking pans and cooled.


Tuesday, July 26, 2011

Summery Green Tomato Salsa adds tangy-sweet burst of flavor to grilled items

Here’s a great one to try as you look for ways to dress up grilled chicken and other items you cook outdoors: Green Tomato and Peach Salsa. The tangy-sweet taste of this quick, colorful salsa pairs perfectly with grilled chicken or pork or even fish.

I adored finding this recipe in the “ways with green tomatoes” section of the recent Southern Living magazine I’ve been mentioning. Not only did it give me some more green tomatoes ideas, it also went into my peach-iana file because one large peach is part of the mix.

Other fresh additions are sliced green onions and fresh cilantro, along with a dressing of olive oil, white wine vinegar, honey, salt, and ground red pepper.

You’ll love this summery, sensational topping as much as we did!

Green Tomato and Peach Salsa

2 large green tomatoes, diced
1 large fresh peach, diced
3 green onions, sliced
1/4 cup olive oil
1 tablespoon minced fresh cilantro
2 tablespoons white wine vinegar
1 tablespoon honey
1/2 teaspoon salt
1/4 teaspoon ground red pepper

Stir all ingredients together. Cover and chill 1 hour before you serve. Makes about 4 cups.


Monday, July 25, 2011

Whip this one up quickly! Chilly Peach Soup cools from head to toe

What a shocker to the old system! All our days last week were involved with a family trip to beautiful, colorful Colorado, in which the temps, though warm for this time of the year, weren’t 105 degrees as we are experiencing in Texas. One evening as we left for dinner, the thermometer registered 72. Talk about pleasant! When we exited the car at the Denver restaurant, the most exquisite cooling breeze blew about around us. People seemed generally happier; drivers were more courteous. No one had that, “It’s-been-triple-digits-for-days-with-no-end-in-sight-what-are-we- gonna-do?” look on his or her face.

Quick re-entry help was needed when we returned to the Texas furnace. I whipped up some Chilly Peach Soup, which had been on my must-make list to broaden my peach-recipe repertoire. You can’t imagine how soothing this dinner-starter dish was—the most delicious blend of peaches and nectarines with honey, nonfat plain yogurt, lemon juice, and cinnamon stirred in. The only difficult part was the peeling of all the ripe peaches and nectarines; I persuaded Hubby to do this tedious step. Then I stuffed the peeled fruit in the blender to puree until everything was mashed and liquid-y. After all the ingredients were folded in, I let the mixture chill in the fridge for about an hour. Not a long chill-time is needed, since the yogurt and lemon juice already are cold. I garnished with a few peach slices and a few sprinkles of cinnamon.

I could have been dining while seated in a meat locker and not have been more chilled. Chilly Peach Soup cooled from head to toe. Oh, and did I mention that the taste was absolutely divine? In this inferno, no one should be surprised that identifying cooling properties precedes the flavor attributes when one writes about a recipe. But the blend of pureed peaches and nectarines was memorable indeed.

Chilly Peach Soup

3 cups ripe peaches, peeled and sliced
2 cups ripe nectarines, peeled and sliced
2 cups vanilla nonfat yogurt
2 tablespoons honey
2 tablespoons lemon juice
1/2 teaspoon cinnamon

Puree the peaches and nectarines one batch at a time. Add yogurt, honey, lemon juice, and cinnamon; stir well. Pour into bowls; garnish with peach slices and a sprinkle of cinnamon. Chill well before you serve. Makes 4 servings.


Wednesday, July 20, 2011

Make some summer days lazy with this Chicken and Sweet Potato Stew

Lazy summer days? Well, any more, they’re hardly lazy. Summer has its own hectic pace, with so much to do within so little time. After all, July 4th is already passed. Time marches on toward Labor Day and back to school.

But a recipe such as this one, furnished by the Chickasaw Nation Nutrition Services, is just the simplest, so go ahead and be lazy! Throw all ingredients into a slow cooker. The chicken doesn’t even have to be browned beforehand. Open a package of chicken breasts, cut them into chunks, toss in some peeled sweet potatoes and a few other items. Three hours later, dinner’s ready. The chicken, sweet potatoes, and mushrooms make a dandy combination. A few blogs ago I mentioned that I had served Black Bean and Corn Salad alongside this recipe and promised to feature it later. With so many peach dishes to write about in recent days, I almost forgot, but here is it—truly the makings of an easy, healthy dinner to remember.

Chicken and Sweet Potato Stew

4 chicken breasts, cut into chunks (approximately 1 pound)
2 pounds sweet potatoes, cut into chunks
1/2 pound mushrooms, sliced
1/2 cup chopped onion
4 garlic cloves minced
1 cup white cooking wine
1/2 teaspoon rosemary, dried
1/2 teaspoon black pepper
1 1/2 tablespoons white wine vinegar

Place the chicken, sweet potatoes, mushrooms, onion, garlic, white wine, rosemary, pepper, and vinegar in a 6-quart slow cooker. Stir to combine. Put the lid on and cook on high for 3 hours or until potatoes are tender and chicken is cooked through. Makes 7 1-cup servings.


Tuesday, July 19, 2011

Pears in a pear tree (minus the partridge) stir up into a memorable breakfast muffin

I’m just not believin’ these delicious pears are really ours—well, not exactly ours, but God’s. He loans us our garden to tend and cultivate. But we sure are having a good time tending and cultivating. And to look at our pear tree, only in its second season, and see all those gorgeous pears dangling from its limbs as though they were Christmas ornaments—well, it just takes my breath away.

I’ve got just the recipe in which to use them, too—Pear Pecan Muffins, clipped from a 2002 Taste of Home magazine that featured every kind of muffin under the sun. Any time I have some pears on hand, I whip these up. The pear chunks merged with our homegrown pecans stir into what becomes a marvelous breakfast treat—terrific with a glass of cold milk or a steaming cup of coffee or tea.

When you first mix up the batter, you may wonder why it doesn’t seem more moist. The batter doesn’t pour into the greased muffin cups. You kinda have to massage it in, just as you might spoon cookie dough onto a cookie sheet and sorta shape it as you go. What happens is that as the muffins bake, the juice from the pears oozes into the batter. This actually produces a very moist muffin. If it’s somewhat on the crumbly side, don’t despair. The muffin itself is like an all-over streusel topping that has baked around the pears.

I used this as a Saturday morning treat to jumpstart a busy weekend with kinfolk visiting. I wanted to share with them some of our backyard garden’s finest.

Pear Pecan Muffins

3 cups all-purpose flour
2 cups sugar (or sugar substitute)
2 teaspoons baking soda
1 teaspoon ground cinnamon
1/2 teaspoon salt (or salt substitute)
2 eggs (or 1/2 cup egg substitute)
1 cup vegetable oil
1 teaspoon vanilla extract
4 cups chopped peeled ripe pears (about 6 medium)
1 cup chopped pecans

In a large bowl combine the flour, sugar, baking soda, cinnamon, and salt. In another bowl combine the eggs, oil, and vanilla; stir into dry ingredients just until moistened. Fold in the pears and pecans. Fill muffin cups two-thirds full. Bake at 350 degrees for 25-30 minutes or until a toothpick emerges clean. Cool for 5 minutes before you remove muffins from pans to wire racks. Makes about 2 dozen.


Monday, July 18, 2011

Green Tomatoes (this time in a burger) just keep happy-ing up our lives

Green tomatoes are wriggling their way into just about everything on our dinner table this summer. After Southern Living in a back issue featured inventive ways to use this delicacy, then in its most recent edition it slipped in another green-tomato recipe: Green Tomato Feta Burgers. As I’ve already blogged, I love nothing better than a hamburger and always seek ways to put a new twist on them. This did it!

The magazine first featured a recipe for Best Turkey Burgers, which forms the basis for the other burger dress-ups that follow. The basic burger involves ground turkey, salt or salt substitute, lemon zest, mayo, and fresh parsley.

Then, for the reset of the story, SL recommended adding a container of feta cheese, red onion, and minced oregano. Burger patties shaped from this mixture then go on the grill. A word of warning that because these are turkey burgers, their ability to stay constituted into a pattie and not crumble is compromised a little, so better use a greased piece of aluminum foil or a grilling pan to help hold them together.

The result was a burger to end all burgers, warm and even a little crusty from the grill. And where do the green tomatoes, straight from my garden’s tomato rows, fit in? They’re toppings along with a thinly sliced cucumber (I used an avocado instead) and a shake of red pepper flakes.

As the magazine touts, this recipe takes this backyard basic to new heights. Even the crumbly parts that didn’t make the core pattie were wonders to behold.

Green Tomato-Feta Burger

2 pounds lean ground turkey
1 teaspoon salt (or salt substitute)
1 teaspoon lemon zest
1/2 cup lite mayonnaise
1/4 cup chopped fresh parsley
1 (4-ounce) container crumbled feta cheese
1 tablespoon finely minced red onion
1 teaspoon minced oregano

Preheat grill to 350 to 400 degrees (medium-high) heat. Combine ingredients gently. Shape mixture into 6 (5-inch) patties. Grill, covered with grill lid, 6 to 7 minutes on each side or until a meat thermometer inserted into thickest portion registers 170 degrees. Top each burger with sliced green tomatoes, lettuce, thinly sliced cucumber or avocado, a pinch of dried crushed red pepper, and a fresh dill sprig.


Friday, July 15, 2011

Asian Salmon Burgers—a healthy twist to the burger "gotta-have"s

I’ve already established that I’m a nut-case for burgers. I acquired this tendency honestly. Practically until her dying day at 93 my mother had to have her cheeseburgers. If she knew I were heading out for an errand, she’d ask whether I’d be near a Burger Street or Braum’s so I could bring her back a juicy meat patty stuffed between two buns (always with onions). “And don’t hold the onions,” she’d instruct as I was about to walk out the door.

Burgers, however, get a bum rap these days. Greasy, juicy ground beef isn’t seen as the healthiest option. Fortunately other ways exist to help scratch the burger itch.

I loved this recipe for Asian Salmon Burgers that I found in Prevention magazine’s June issue.
Skinless salmon fillet along with bread crumbs, green onions, and several other ingredients are processed in a food processor until the mixture is coarsely chopped. Grilling in a large nonstick frying pan (coated with cooking spray) for about 10 minutes, 5 on each side, is a better alternative to using a countertop grill because it keeps the meat mixture from falling apart. A tip that appears in Prevention recommends holding off flipping a burger until it’s thoroughly ready; flipping too soon is what causes a burger to crumble.

We just loved these very different, healthy burgers with an Asian twist.

Asian Salmon Burgers

1 pound skinless salmon fillet, cut into chunks
1/4 cup fresh whole wheat bread crumbs
1 large egg white
2 large cloves garlic, chopped
2 teaspoons reduced-sodium soy sauce
1/2 teaspoon dark sesame oil
2 green onions, chopped
4 tablespoons pickled ginger
2 tablespoons toasted sesame seeds
1/4 cup baby spinach
4 whole-wheat buns, toasted

Put salmon, bread crumbs, egg, garlic, soy sauce, oil, green onions, and 2 tablespoons of the ginger in food processor. Pulse until coarsely chopped. Form into 4 equal patties. Sprinkle tops with sesame seeds. Heat large nonstick frying pan coated with cooking spray over medium heat. Put patties sesame-seed-side down in pan. Cook 5 minutes. Flip and cook until done, 5 minutes longer. Serve burgers on buns and top with spinach and remaining 2 tablespoons pickled ginger. Makes 4 servings.


Thursday, July 14, 2011

Thick, rich homemade tomato juice a fitting use for tomatoes by the bucketloads

Doesn’t the photo at left look like something you want to stand up and salute? No, this Tomato Mary wasn’t a part of our recent Fourth celebration, but it was made in anticipation of another great event—the planned arrival this afternoon of Hubby’s sister, Mary, and her husband, Richard. They’re traveling on motorbikes and riding from Oklahoma down to the Dallas area to see us. We’re rejoicing at that (and praying for their safety).

Tomato Mary is a recipe that hails from my cookbook, Way Back in the Country Garden. Seems as though it would be the perfect pick-me-up to serve these loved ones after their arduous trip. Because we’re absolutely COVERED UP in tomatoes from our garden, I was thrilled that I can use up a passel of tomatoes at one time (Tomato Mary calls for 10).

You can’t beat the ease of this thing. First you core and dice the tomatoes and dump them into a large kettle. Then add the leaves from a couple of celery stalks (not the celery itself; just the leaves), onion slices, a bay leaf, vinegar, sugar, and salt. This simmers on the stove for 30 minutes. After it cools, pour the tomato mixture into a blender container. Pulse until the ingredients are pureed and the liquid thickens.

You’ll be staggered at the rich, thick juice—far more flavorful than anything canned you can purchase. This vibrant, nonalcoholic drink can be seasoned with a squeeze of lemon and a squirt of hot pepper sauce.

Tomato Mary

10 tomatoes, diced
1/4 cup vinegar
1 teaspoon sugar (or sugar substitute)
1 teaspoon salt (or salt substitute)
1 bay leaf
2 shoots celery leaves
2 slices sweet onion

Bring all ingredients to a boil. Then reduce heat and simmer for 30 minutes. Allow mixture to cool. Pour into blender container; pulse for as long as necessary to make a puree of the vegetables. Seal in sterilized pint jars or refrigerate as long as 5 days. Serve in a tall glass; garnish with a celery stick or sprig of herbs.


This summery, fresh Pico de Gallo perks up just about anything

While I’m on the subject of tuna (i.e. yesterday’s blog and the great Tuna Grape Salad), let me tell you about another goodie—a Pico de Gallo that recently we used to dress up tuna steaks.

The recipe for this relish arrived with our Kroger grocery circular—surely one of the best recipe sources I’ve found. All the ingredients were from the garden. The only things I didn’t simply walk out my back door and pluck were the cilantro and cucumber; these were from the store right at this time. We had no cukes sprout up this year, unfortunately.

But tomatoes we have by the bucketloads; I was thrilled to see that this called for 6 to 8 of them. This is our first year to have our own red onions; as a result we’ve been using red onions in everything. Last night Hubby asked, “Before now, did we really use red onions this much?” Not really, because we didn’t have them nearby. Now they’re only a few steps away.

So we combined them with the tomatoes, green bell pepper, cucumber, cilantro, jalapenos, cilantro, and lime juice and topped our steaming tuna with the mixture, but oh how the sky is the limit with the ways this relish can be used! I can imagine this topping chicken, steaks, or eggs or served with tortilla or bagel chips.

All my fresh tomatoes just sing in this vibrant dish that features all that’s good about summer.

Pico de Gallo

6-8 large tomatoes, cored and chopped
1 green bell pepper, seeded and chopped
1 large red onion, chopped
1 large cucumber, seeded and chopped
2-3 jalapeno chilies, seeded and finely chopped
1 bunch fresh cilantro, finely chopped
1/4 to 1/2 cup lime juice
salt (or salt substitute) to taste

In a bowl combine the tomatoes, bell pepper, onion, cucumber, jalapeno chilies, cilantro, and lime juice. Season with salt or salt substitute. If desired add additional lime juice and jalapeno. Makes 24 servings. Refrigerate any leftovers.


Wednesday, July 13, 2011

Retiring the ho-hum tuna sandwich spread in favor of this lively dish

Its title was Tuna Grape Salad, but in our book, it just as easily could be Tuna GREAT Salad. Just so many ways exist to dress up the base element of a tuna sandwich, but this is one of the best combos I’ve tried.

Tuna, red grapes, onion, green onion, celery, chopped almonds, and curry for seasoning set this mixture apart as a spread on a sandwich or an elegant salad on a buffet table. In fact, to style this accompanying photo, I poured the salad into the one of the fanciest serving dishes I own. It looked right at home in the hobnail glass. Hard to find a salad that’s just as comfortable between two slices of bread as it is ready to serve to an uptown ladies’ lunch.

To think that when I was growing up, I disdained tuna sandwiches and rolled my eyes whenever my mom put them on the table. For shame!

My undying thanks to “Celebrating a Healthy Harvest” cookbook for suggesting this dish under its “grape” category.

Tuna Grape Salad

2 (4-ounce) cans chunk light tuna, drained
2 cups red grapes, halved
1/4 cup plain nonfat yogurt
1/4 cup lite mayonnaise
2 teaspoon yellow curry powder
2 tablespoons green onions, sliced
1/4 cup chopped almonds
2 tablespoons onion, minced
1 cup celery, diced

Mix all ingredients. Serve on bread or with crackers or chips.


Tuesday, July 12, 2011

Fresh green onions dress up this ketchup; put this totable chicken dish on the map

But it doesn’t have anything to do with eating the garden-fresh way, I protested to my daughter. My offspring was extolling the wonders of Chicken Fingers with Curry Ketchup, which I had served her and her family for the July 4th weekend. Not the easiest-pleased eater, she raved about this dish and remarked, “You are going to blog about this, aren’t you?”

“Can’t,” I replied. It didn’t feature a wonderland of fresh fruits or veggies. She countered that if my blog was to feature recipes that would tempt the palate, Chicken Fingers with Curry Ketchup would win hands-down. Finally we analyzed that the Curry Ketchup actually was put on the map by the chopped green onions contained therein. Good enough qualifier. So here goes.

The nuggets were oven-baked instead of fried, with high-fat breading replaced by crushed cereal crumbs. Chicken bits were dipped first in egg (or egg substitute) and then in a wonderful mixture of crushed chex cereal (I used Corn Chex but also have tried this with cornflake and crisp rice cereal crumbs), paprika, garlic powder, nutmeg, and cayenne. After being cooked over olive oil to soften, the green onions were mixed with curry powder and ketchup. The recipe was from a years-ago Family Circle magazine feature on family picnics and easy, totable foods that make a movable feast. Our lunch required only that we move the tenders from kitchen to back yard, but they could have gone anywhere and been enjoyed cold as well as hot from the oven.

Lest you think we’ve deviated from our goal here, I hasten to add that if you leave out those fresh-from-the-garden green onions in the Curry Ketchup, this meal will flop. Just plain ole ketchup straight from the bottle, without enhancements, never will do. Garden-fresh to the bone.

Chicken Fingers with Curry Ketchup

1 tablespoon olive oil
2 green onions, trimmed and sliced thin
1 teaspoon curry powder
1 cup ketchup (we used no-salt-added ketchup)
1 cup cornflake crumbs (or other crispy cereal)
1/4 cup grated Parmesan cheese
2 teaspoons paprika
1/2 teaspoon garlic powder
1/4 teaspoon nutmeg
1/8 teaspoon cayenne pepper
2 eggs (or 1/2 cup egg substitute)
2 pounds chicken tenders

Heat oven to 450 degrees. Line a baking sheet with nonstick foil (if you use regular foil, spray it thoroughly with cooking spray). In a small saucepan heat olive oil over medium heat. Add green onions; cook 2 minutes until onions are softened. Add curry powder; cook for 1 minute. Stir in ketchup; take off the heat. Cool, cover, and refrigerate ketchup mixture until ready to serve. In a shallow glass dish mix together crushed cereal crumbs, Parmesan cheese, paprika, garlic powder, nutmeg, and cayenne. In a second glass dish lightly beat eggs. Dip chicken pieces into egg and then into cereal mixture to coat completely. Place chicken on prepared baking sheet. Bake at 450 degrees for 20-25 minutes or until an instant-read thermometer registers 160 degrees when it is inserted into the thickest part of chicken. Remove from oven and cool. Makes 8 servings.


Monday, July 11, 2011

A peach of a salad—great mixture of the salty and sweet

They’re ba-a-a-a-ck! More ways with peaches—remember, we still have trees #5 and #6 yet to produce. I’m finishing up the yield of tree #4 with two more producers to harvest before the summer ends. I’ve been eyeballing this recipe forever and wondering . . . cinnamony peaches with spinach and feta cheese? As my mother used to say, could this actually taste decent?

Not only did Grilled Spiced Peach Salad work, we promised ourselves to repeat it first before we go to the other recipes on our wish-list after the remaining two trees produce. That’s before Peach Enchiladas, French Crumb Peach Pie, Chilly Peach Soup, and a host of other to-drool-over peach goodies we want to try.

This salad was terrific warmed but also could be served with the peaches cold. Peaches and feta provided just the right sweet-salty blend over the spinach bed. Thanks to “Celebrating a Healthy Harvest” for inspiring us . . . and for convincing us yet again that seemingly odd-couple combinations produce truly amazing dishes.

Grilled Peach Salad

4 firm but ripe medium peaches
1 tablespoon cinnamon
cooking oil spray
1/4 cup feta cheese
8 cups spinach leaves

Peel peaches; cut peaches in half to remove the pit. Cut each half in half. Dust peach quarters with spice mixture. Set aside for 20 minutes. Spray peaches lightly with cooking oil on each side. Grill or broil until lightly browned; turn often. Peaches should be only slightly softened. Remove from heat; cool slightly. Slice and place on a bed of lettuce. Sprinkle with cheese; serve. Makes 4 servings.


Friday, July 8, 2011

The Fourth of July corn dish that wasn’t—but it sure was on the Fifth!

This is the saga of the Fourth of July dish that wasn’t. On the morning of the Fourth, last Monday, I asked Hubby to heat up the backyard grill to prepare food for our guests. When the fire was ready, I gave him a plate of fresh veggie kabobs to put on. “That’s all?” he asked, puzzled. “I fired up the grill just for this one item?” “Sorry,” I replied. “The chicken tenders bake in the oven, so you won’t be fixing them.” I had a nagging sense that I actually DID have something else for him to grill, but I reviewed my written menu. Nothing.

Then during the week this week I looked in the vegetable bin of the refrigerator and found some waiting ears of corn. Eureka! I had been supposed to cook a fabulous Southern Living suggestion for the 2011 Fourth entertaining: Grilled Jalapeno-Lime Corn on the Cob. Terrific, I muttered. Too late. My written menu for the Fourth still lay atop my microwave. I looked again. Not listed. I had followed my menu to a T but simply hadn’t written down Grilled Jalapeno-Lime Corn on the Cob originally. No wonder Hubby had looked at me a little quizzically.

Sorry, holiday lunch guests (you know who you are). Here’s what you would have enjoyed. (We actually had had no room on our plates or in our bellies for another helping of anything. I don’t think anyone pushed back from the table hungry.) Nice thing was, I whipped up the corn dish forthwith. That same night, Hubby and I dined on it—corn that’s been roasted to perfection and then rubbed with a great mixture of softened butter, jalapeno, garlic, lime juice and zest, and cilantro.

A way-novel suggestion for cooking some delicious, different corn—a recipe I’ve already placed in my Fourth of July 2012 folder! And next year, I may be a year older, but I promise not to forget!

Grilled Jalapeno-Lime Corn on the Cob

8 ears fresh corn, husks removed
vegetable cooking spray
salt (or salt substitute) and freshly ground pepper
1/2 cup butter, softened
1 jalapeno pepper, seeded and minced
1 small garlic clove, pressed
1 tablespoon lime zest
1 tablespoon fresh lime juice
2 teaspoon chopped fresh cilantro

Preheat grill 350 to 400 degrees (medium-high heat). Coat corn lightly with cooking spray. Sprinkle corn with desired amount of salt and pepper. Grill corn, covered with grill lid, 15 minutes or until golden brown. Turn corn occasionally. Meanwhile stir together butter and next 5 ingredients. Remove from grill the roasted corn ears; cut them into thirds. Serve corn with butter mixture. If desired garnish with extra cilantro. Makes 8 servings.

Thursday, July 7, 2011

Cool your socks off with this refreshing Cucumber Raita

Now for a dish that’s probably not going to automatically relegate itself to the “comfort-food” category as yesterday’s Peach Cobbler did, but I guarantee you that if you’re adventuresome enough to try it, it soon will become a favorite.

In fact, at first glance, to these Southern eyes this recipe for Cucumber Raita seems to have weird written all over it. I wasn’t familiar with the dish, so I did a little Internet research and found that quite frequently it pops up on cooking-idea websites; it often is served with Indian or Moroccan food. Interesting, since the provider for the recipe was the Native American tribe of which my hubby is a member. Yep, this is yet another dish that inspired by the Chickasaw Nation Health Services (see the inscription on the wooden spoon in the photo?), a favorite recipe source for me. They always have such good, though different, ideas.

Cucumber Raita is a magical, cooling salad that’s perfect for a hot, summer day. I could imagine taking it to a covered-dish picnic and having guests crow about this refreshing dish that’s way past the norm of potluck fare. Cucumbers, raisins, toasted walnuts, and mint leaves are stirred into plain, non-fat yogurt. The mixture is allowed to chill for at least 30 minutes before serving (but the longer, the better). Mint leaves make an attractive garnish.

Forget your ambrosia, cherry dream salad (made with whipped topping), or any of the other blissfully cool but standard summer-day dishes. When high temps are blowing the top out of the thermometer, cool Cucumber Raita with its healthy ingredients blows the top out of all the other choices.

Cucumber Raita

1 cup raisins
1 cup water
1/3 cup walnuts, broken by hand (not finely chopped)
1 large cucumber, seeded and died
2 tablespoons mint leaves, minced
2 cups plain, non-fat yogurt, drained
fresh ground black pepper

In 1 cup water boil raisins for 1 minute. Leave to soak for 5 minutes; then drain well. Toast walnuts for 10 minutes in a 350-degree oven. Cool walnuts completely. In a bowl combine all ingredients. Chill for 30 minutes; stir before serving. Makes 4-6 servings.


Wednesday, July 6, 2011

Good dish of Peach Cobbler cures all ills, even the wipe-out feeling of returning from a holiday weekend

Another peach tree—number four in our garden—has surrendered its yield—a guarantee that in the near future more peach recipes are sure to find their way into this blog. Today’s is a tried-and-true love that every summer I yearn to put on the table—a very simple but wonderful Peach Cobbler. If you want to cut to the chase and get a peach dessert whipped up lightning-fast, here’s your ticket.

This recipe is courtesy www.pickyourown.com and is so easy, I could make it in my sleep (and just about did. Why is the first work day after returning from a holiday always such a wipe-out?) But a good steamy dish of peach cobbler cures all ills!

Peach Cobbler

3 pounds fresh ripe peaches, sliced (about 6 cups when peaches are sliced)
1/2 cup sugar (or sugar substitute)
2 tablespoons all-purpose flour
1 tablespoon lemon juice
1/2 teaspoon vanilla extract
1/2 teaspoon ground cinnamon
1/4 teaspoon salt (or salt substitute)
2 tablespoons butter or margarine, cut into tiny pieces

Topping
1 cup all-purpose four
1 cup sugar (or sugar substitute)
1 teaspoon baking power
1/4 teaspoon salt (or salt substitute)
4 tablespoons butter or margarine, softened
2 eggs slightly beaten (or 1/2 cup egg substitute)

Put into a large bowl fresh peaches, 1/2 cup sugar, 2 tablespoons flour, lemon juice, vanilla and almond extracts, cinnamon, and 1/4 teaspoon salt. Add 1/4 cup water. With a wooden spoon mix peach mixture gently and then transfer to an 8-inch-by-8-inch-by-2-inch baking dish. Dot with 2 tablespoons butter. Preheat oven to 375 degrees. To prepare topping, in a small bowl put 1 cup flour, 1 cup sugar, 1 teaspoon baking powder, 1/4 teaspoon salt, 4 tablespoons softened butter, and eggs. With a wooden spoon beat until topping is smooth. With back of spoon spread topping over peach filling. Try to space topping evenly. Place cobbler on center rack in preheated oven. Bake for 50 minutes or until peaches are tender and the crust is a light golden brown. Remove from oven to wire rack and let stand for about 30 minutes. Makes 6-8 servings.


Tuesday, July 5, 2011

Just-right blend of sweet/tangy in this colorful, healthy salad that brightened our Fourth

A whole artillery of wonderful foods helped make our 4th star-spangled in every way. Difficult to know where to start, but Black Bean & Corn Salad certainly lit some fireworks among our taste buds. To Hubby and me this seemed to be the quintessential picnic salad. Those plump, almost candy-like tomatoes from the heart of our garden were right in the big middle of all the corn and black beans. Fresh, fresh, fresh!

Other items that contributed to the wonder that was this salad were red peppers, green onions, avocado, and cilantro. A lime-olive oil-garlic marinade in which the veggies bathed in the fridge overnight made just the right blend of slightly sweet/tangy. It was great with our slow-cooker chicken/sweet potato stew (more on this latter item in a later blog) that we carted with us to our place at the lake, but we also could envision it alongside burgers, grilled chicken, or other picnic fare.

The recipe for this enjoyable dish appeared among the pages of our Garland Messenger community newspaper. I simply was browsing through and mulling over hometown news when suddenly a colorful page of food dishes and their how-to’s appeared. After the weekend we spent experiencing Black Bean & Corn Salad, I certainly was thankful for that colorful page.

Black Bean & Corn Salad

1/3 cup fresh lime juice
1/2 cup olive oil
1 clove garlic, minced
1 teaspoon salt
1/8 teaspoon ground cayenne pepper
2 (15-ounce) cans black beans, rinsed and drained
1 1/2 cups fresh corn kernels
1 avocado—peeled, pitted, and diced
1 red bell pepper, chopped
2 tomatoes, chopped
6 green onions, thinly sliced
1/2 cup chopped fresh cilantro

In a small jar place lime juice, olive oil, garlic, salt (or salt substitute), and cayenne pepper. Cover with lid; shake until ingredients are well mixed. In a salad bowl combine beans, corn, avocado, bell pepper, tomatoes, green onions, and cilantro. Shake lime dressing and pour it over the salad. Stir salad and refrigerate. Allow to marinate for several hours or overnight. Makes 10 servings.


Friday, July 1, 2011

Crazy good! Homemade Cherry Jam

Cherry pie is thought to be utterly All-American; as the Fourth approaches, we don’t have cherry pie to serve our guests, but we do have Cherry Jam! I’m not sure I ever remember Hubby extolling any food I’ve put in front of him quite like he did this homemade Cherry Jam that I recently served him over biscuits. I got out my jars and jar lids, sterilized them, and saved some of the jam for a future date. This upcoming weekend we’ll open some of my put-by jam and enjoy it all over again.

Making jam has never been so simple as with this recipe, from “Celebrating a Healthy Harvest”. Two cups of cherries, pitted and chopped, went into a quart pan with powdered pectin, lemon juice, almond flavoring, and spices. After this boils fully, add sugar and let that cook for 3 minutes. One wonders from whence the liquid to make the jam will emerge, since the only liquid you’ve added has been 2 tablespoons lemon juice. Not to worry. As the pectin and the cherries combine over the heat, the juice from the cherries multiplies as they cook down. When you skim the foam off the top of the mixture and pour it into hot, sterilized canning jars, you’ll be surprised at how much it makes—about 3 cups.

You’ll think you’re eating cherry pie filling when you spoon into your first jar of jam and dish out servings onto biscuits, toast, or waffles. When Hubby asked what kinds of foods I was planning for the July 4th weekend and I told him we’d be dipping into more Cherry Jam, from his reaction you’d have thought he’d been given the entire fireworks store!

One note: although I almost always use sugar substitute in recipes I try, I played it straight this time and left in the regular sugar. Although one definitely can make jams and jellies with sugar substitute, this time I didn’t want to chance it and stuck with the recipe’s exact ingredients—no subs. This means I’ll have to do more Hubby Patrol and make sure he doesn’t eat quite as much of it, but he can celebrate his freedom in other ways than over-indulging.

Cherry Jam

2 cups pitted cherries, chopped
1 ounce (half of a 2-ounce package) powdered pectin
2 tablespoons lemon juice
1 teaspoon almond flavoring
1/4 teaspoon salt
1/4 teaspoon ground cinnamon
1/4 teaspoon ground cloves
2 cups sugar

Place cherries, pectin, lemon, almond flavoring, and spices into a 6-quart pan. Bring to a full rolling boil that cannot be stirred down. Add sugar; bring mixture to a full rolling boil and cook for 2 minutes. Skim foam off mixture and set aside. Pour cherry mixture into hot, sterilized jars. Leave 1/4-inch head space. Seal. Cool completely before you refrigerate. Makes 2 1/2 to 3 cups of jam.