Kay Wheeler Moore

Welcome to my blog

Hello. . .

The Newfangled Country Gardener is for anyone who has a garden, would like to have a garden, or who simply enjoys eating the garden-fresh way. I don't claim to be an expert; in this blog I'm simply sharing some of the experiences my husband and I have in preparing food that is home-grown.

About the author

Kay Wheeler Moore is the author of a new cookbook, Way Back in the Country Garden, that features six generations of recipes that call for ingredients that are fresh from the garden. With home gardening surging in popularity as frugal people become more resourceful, this recipe collection and the stories that accompany it ideally will inspire others to cook the garden-fresh way and to preserve their own family food stories as well. The stories in this book center around the Three Red-Haired Miller Girls (Kay's mother and aunts) who grew up in Delta County, TX, with their own backyard garden so lavish that they felt as though they were royalty after their Mama wielded her kitchen magic on all that was homegrown. Introduced in Kay's previous book, Way Back in the Country, the lively Miller Girls again draw readers into their growing-up world, in which a stringent economic era--not unlike today's tight times--saw people turn to the earth to put food on the table for their loved ones. The rollicking yarns (all with recipes attached) have love, family, and faith as common denominators and show how food evocatively bonds us to our life experiences.

Thursday, March 31, 2011

Home-grown lettuce a base for this tropical salad with a kick

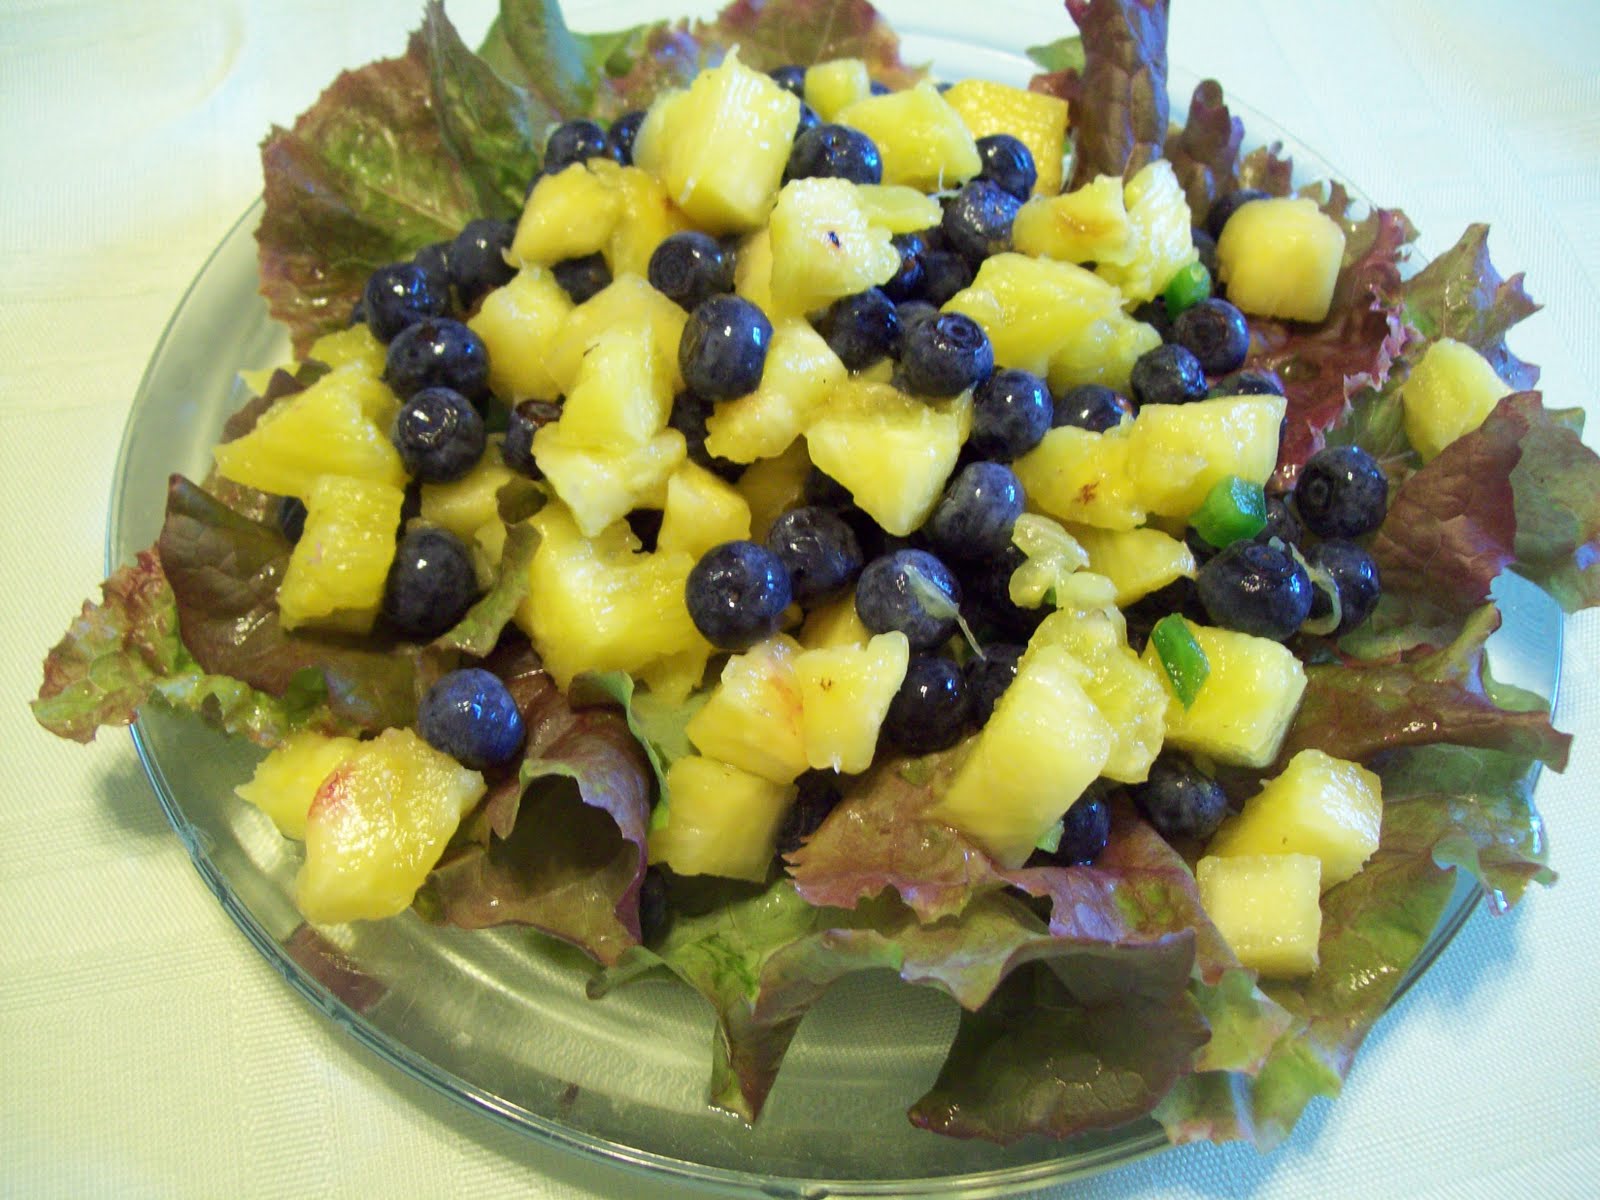
Absolutely nothing like it—fresh lettuce picked straight from the garden! Within a matter of about five minutes last evening some gorgeous new red-leaf lettuce was plucked from the earth, rinsed in the sink, dried with paper towels, and being passed around at our dinner table as the basis for Tropical Blueberry Salad. I’ve never crunched into something so lovely. Another survivor of the Super Bowl-week freeze in our garden, lettuce is wrongfully presumed to be delicate and vulnerable. Tough as nails yet tender to the taste! If folks had any idea of the difference between supermarket lettuce and the kind that is home-grown, they’d be outside turning up any square inch of dirt they could muster into a mini-garden for greens.

The salad itself was not to be outdone by the dynamite lettuce. Tropical Blueberry Salad coupled fresh blueberries with fresh pineapple chunks. Giving it a real kick was a jalapeño pepper, grated lime peel, and hot-pepper sauce. Although the recipe (courtesy Celebrating a Healthy Harvest) suggested refrigerating the mixture for one hour before serving, I’d recommend letting this marinate overnight so the unusual flavor combo of the sweet and the fire-laden elements can blend and work their magic in this odd-couple pairing.

High in antioxidants and manganese, pineapple also has been lauded for maintaining good eye health, particularly in preventing age-related eye problems such as macular degeneration. And of course the health benefits of blueberries continue to be sung loudly from the highest hill: they’re said to rank number-one in the world of anti-oxidants. For the aging they’re considered bright rays of hope to those of us in Geezerville, because they’re thought to help keep the memory sharp for a long time.

Along with the never-been-fresher red-leaf lettuce (since red and dark-green leafy vegetables are generally higher in nutrients than light greens), who could argue with this salad combination?

Tropical Blueberry Salad

2 cups fresh blueberries
2 cups fresh pineapple chunks
1 tablespoon fresh jalapeño peppers, chopped
2 teaspoons lime peel, grated
dash of hot-pepper sauce
enough red-leaf lettuce to line four salad plates

Combine blueberries, pineapple, jalapeño peppers, lime peel, and hot-pepper sauce; stir gently to blend. Refrigerate for 1 hour or preferably overnight. Serve on a bed of lettuce. Makes 4 servings.


Wednesday, March 30, 2011

Once again, adding green onions blasts dish to the stars!

My fresh green onions have done it again. Remembering my Bistro Chicken Salad and how pulling a handful of green shoots from the soil and chopping them up for this dish brought enough zing to blast me to the stars, I just had to add them to a recent entree of Tuna Cakes with Creole Mayonnaise. Utter delight!

The Tuna Cakes recipe from Southern Living’s recent “No-Fuss Dinners” article appealed to me simply because of its title. Who doesn’t respond to a headline advertising easy meals that “take the pressure off weeknights”? Especially on days when I go sit with Grandmunchkin in the afternoons to help out his mommy, getting a quick meal on the table after I arrive home late is always a challenge. I also loved the idea of stirring up the zesty “Creole Mayonnaise”—regular fat-free mayo spiced up with Creole seasoning and lemon juice—as a topping. I always welcome suggestions about how to enhance a prosaic can of tuna fish.

After all that, however, the mixture still looked a little bland to me. That’s when I remembered our green onion rows that proudly wave in the March wind. I stepped to our backyard garden plot and pulled one that looked especially hardy. A thorough rinse, a few chops on the cutting board, a good stir into the tuna mixture, and this evening meal just took on new dimensions.

A word about the prosaic can(s) of tuna fish, however. The recipe below (originated from Southern Living, as I mentioned) calls for 2 extra-large cans of tuna or 5 of the small ones. I had only 2 small cans on hand, so I stirred it up with those 2 but stuck with the portions in the regular recipe. Even with this adaptation, the amount made 8 servings of nice-sized, flavorful patties—ample for a couple of good meals for me and Hubby.

Tuna Cakes with Creole Mayonnaise

2 (12-ounce) cans solid white tuna in spring water, drained well (5 5-ounce cans solid white
tuna in spring water, drained well may be substituted)
1 1/4 cups Italian breadcrumbs (I used two large slices of whole-wheat bread, pulsed them in a blender, and added 2 teaspoons Italian seasoning to make my crumbs instead of buying already-packaged ones)
2 large eggs, lightly beaten (or 1/2 cup egg substitute)
2 teaspoons lemon zest
2 teaspoons Dijon mustard
1 cup fat-free mayonnaise, divided
1 1/4 teaspoons Creole seasoning, divided (I use the salt-free variety)
1 cup chopped fresh green onions
1/4 cup olive oil
1 teaspoon lemon juice

Drain and rinse tuna. Place tuna and breadcrumbs in a large bowl; stir in eggs, lemon zest, mustard, 1/3 cup mayonnaise, and 1 teaspoon Creole seasoning. Shape mixture into 8 (3-inch) patties. Cook 4 patties in 2 tablespoons hot oil in a large, nonstick skillet over medium-high heat 2 to 3 minutes on each side or until golden; drain on paper towels. Repeat with remaining tuna cakes and oil. Combine lemon juice and remaining 2/3 cup mayonnaise and 1/4 teaspoon Creole seasoning. Serve with hot tuna cakes. Makes 8 servings.


Tuesday, March 29, 2011

Collard greens from the garden mature just in time for celebratory blog

Today marks the 200th posting for my blog; I had hoped to have something spectacular to blog about to celebrate this milestone. Nature provided just the celebratory item!

Yesterday afternoon from the garden Hubby brought in an armful of collard greens, hardy survivors of the ice storm of Super Bowl week back in February.

I didn’t know I could be so in love with collards. The leaves on these were humongous; they were crisp and fresh and perfect. Hubby says that in the past one of our biggest challenges in growing greens of any kind has been picking them at just the right moment. He says often we wait too late; therefore the taste is slightly bitter. This year’s ferrying in of our new greens occurred at the ideal time while they were succulent.

I had been eyeing a recipe called “Wilted Greens Salad” in my Celebrating a Healthy Harvest handbook. It called for combining any greens one happens to have on hand—collards, mustard, beet, kale, Swiss chard, spinach, dandelion—enough to amount to about a pound (I had some spinach in the fridge already.) These then are mixed and wilted in a hot skillet that contains chicken broth and vinegar as the wilting agent. Since the recipe is designed to be served warm, I was unable to determine how it acquired the “salad” label, except I imagined the vinegar mixture which forms the liquid causes this recipe to be as good chilled in the fridge as it is warmed in the skillet.

And need I extol the wonders of greens? Most everyone knows they deliver more nutrients in fewer calories than virtually any food out there. They help regulate blood pressure and contain the important nutrients magnesium, iron, calcium, folate, vitamin C, and vitamin B6, plus all the cancer- and heart-disease fighting phytochemicals. In fact the difference between people who have heart attacks and those who don’t is said to be how many trips they make to the salad bar, provided they make those salads with greens beyond just iceberg lettuce.

Many suggest trimming the stems on leafy greens because they’re thought to be unpleasantly tough, but for my “Wilted Greens Salad”” I threw in the entire collard leaf, stem and all. The stems cooked up just as tender as the leaves did.

The whole experience was a taste-fest; I was very thankful that the collard leaves were spared in the frost and that they matured just in time to help me celebrate this red-letter day of enjoying my delightful blogging pastime. I look forward to Hubby harvesting the rest of the collard-green crop very soon, so we can have this recipe again and often.

Wilted Greens Salad

1/2 cup low-sodium chicken broth
1 tablespoon vinegar
1 pound greens blend (spinach, beet, collard, kale, etc.)
freshly ground pepper and salt substitute to taste

Rinse greens thoroughly. In a 12-inch nonstick skillet heat broth and vinegar over high heat until mixture boils. Add greens; stir and cook, covered, until greens are wilted, about 2-3 minutes. Uncover, stir, and cook on high heat until the greens are tender and the liquid evaporates, about 5 minutes. (Don’t overcook.) Season with salt substitute and pepper to taste. Serve. Makes 4 servings.


Monday, March 28, 2011

Trees will be loaded soon, but can’t wait to try these Peach-Pecan Muffins

Until this weekend’s spring-spoiler cold snap here in Texas, we could view them as fuschsia-colored spring blossoms on four different trees in our garden. The cool, strong, north wind swept those petals off the branches, but before long tiny fruit will be visible. Day after spring day we’ll watch those little ones become more and more plump until—mature peaches! Does any greater anticipation exist regarding the weeks ahead? (A gardening tip: Hubby chose different varieties that ripen in succeeding months to spread out the joy!) Soon our buckets will be full of that ripe, sweet fruit. The “peach” section of my recipe book is ready for ’em.

Whetting my tastebuds for peach-harvest days was a recipe from a recent Southern Living magazine for Peach-Pecan Muffins. The recipe was part of Southern Living’s tribute to one community’s church that for decades had served Lenten meals. Peach-Pecan Muffins represented a traditional menu item that helped draw hordes of people to the luncheons.

The muffins seemed so inviting, I simply couldn’t wait for our own peaches to appear. I sent Hubby to the grocery to bring back a few peaches that bore an “imported from Chile” label. I just had to try Peach-Pecan Muffins, even if the peaches therein were derived from Chile instead of from my own back yard.

Delicious peach chunks were folded into a batter and dropped into muffin cups, with a generous topping of brown-sugar, cinnamon, and pecan streusel. We enjoyed these as a Saturday-morning breakfast item before we departed to conduct round-two of spring cleaning at our place at the lake. I prepared these delicacies on the Friday night before; all evening the plateful of just-baked, wonderful-smelling muffins tempted me, but I self-disciplined and didn’t take my first bite until morning.

Terrific as only something made with fresh peaches can be!

Peach-Pecan Muffins

Pecan Streusel:
1/2 cup chopped pecans
1/3 cup firmly packed brown sugar (can use 1/6 cup brown-sugar substitute)
1/4 cup all-purpose flour
2 tablespoons melted butter
1 teaspoon ground cinnamon

Muffins:
1 1/2 cups all-purpose flour
1/2 cup granulated sugar (or sugar substitute)
2 teaspoons baking powder
1 teaspoon ground cinnamon
1/4 teaspoon salt (or salt substitute)
1/2 cup butter, melted
1/4 cup skim milk
1 egg (or 1/4 cup egg substitute)
1 cup peeled, chopped, fresh peaches
cooking spray

Prepare streusel: stir together pecans and next four ingredients until mixture is crumbly. Preheat oven to 400 degrees. In a large bowl combine flour and next four ingredients. Make a well in center of mixture. Stir together butter, milk, and egg; add to dry ingredients by pouring liquid into well. Stir just until moistened. Gently stir in peaches. Coat muffin tin with cooking spray. Spoon batter into muffin cups; fill two-thirds full. Sprinkle with pecan streusel. Bake at 400 degrees for 20 to 25 minutes or until a wooden pick inserted in center emerges clean. Cool in pan on a wire rack 10 minutes; remove from pan. Serve warm or at room temperature. Makes 12-13 muffins.


Friday, March 25, 2011

Fresh green onions from the garden do for this salad what Elizabeth Taylor did for the movies

I adore the freshness that my garden’s green onions bring to a salad. Walk out my patio door, yank up a few onions, waltz them inside, make a few chops to them on the cutting board, and a recipe gets instant spiritedness. I consider my green onions to be place-holders for the additional garden-fresh veggies that soon are down the road. In my spring garden a few rows over from the green onions, burgeoning tomato plants now wave in the wind. Soon we’ll be able to say goodbye to the produce aisles at the supermarket when our backyard plot moves into its heyday.

I added those green onions to a delightful chicken pasta salad that we enjoyed for dinner last night and probably will dine on throughout the weekend. (For sure this dish will grow better each day as it further marinates.) Whole-wheat penne pasta and chopped, cooked chicken breasts get enlivened with the tomatoes, green onion, red onion, and feta cheese, with a little fat-free Italian dressing to tie it all together.

Bistro Chicken Pasta Salad, served alongside some cut-up orange slices and some fresh grapes, made one of the best weekday meals we’ve enjoyed in a while. As we move closer in to the summer, the dining fare will be lighter, so this recipe’s a winner as things “lighten up” a bit.

Bistro Chicken Pasta Salad

2 cups penne pasta, whole-wheat, dry
cooking spray
1/2 pound skinless chicken breasts, cubed
1 1/4 cups chopped Roma tomatoes
4 ounces Feta cheese
1/2 cup fat-free Italian dressing
1/2 tablespoon dried basil
1/4 cup chopped red onion
1/4 cup chopped green onion
1/4 teaspoon black pepper

Cook pasta according to directions. As you cook omit oil and salt. Drain pasta. Lightly coat skillet with cooking spray and cook cubed chicken until done. Shred the chicken. In a large bowl combine the rest of the ingredients. Add pasta and chicken and toss. Best if allowed to chill in refrigerator a few hours before you serve. Makes 9 servings of 3/4 cup each.


Thursday, March 24, 2011

CORRECTIONS to ingredients in Mushroom Tartlets 3/24/11

Those wonderful mushroom tartlets I blogged about today—confound it, I messed up on my ingredient list. Thanks to a faithful reader I discovered that 1/4 teaspoon fat-free cream cheese actually needed to be 1/4 cup. (1/4 teaspoon would have been microscopic!) Plus I left out a very important item—1/8 teaspoon nutmeg, which you add with onions, garlic, and pepper.

So here’s the (correct) recipe in full. Believe me, this dish is so terrific, you for sure want everything to be right!


Mushroom Tartlets

cooking spray
2 cups chopped mushrooms
1/3 cup chopped onion
3 tablespoons green onion, chopped
1/2 teaspoon garlic, minced
1/8 teaspoon black pepper
1/8 teaspoon nutmeg
1/4 cup fat-free cream cheese, softened (I used Neufchatel)
12 wonton wrappers

Preheat oven to 375 degrees. In small bowl mix mushrooms, onions, garlic, and spices. Add cream cheese; mix well. Spray each muffin cup with cooking spray. In each muffin cup place one wonton wrapper. Spoon 2 tablespoons of mushroom mixture into wonton cups. If you have any mixture left over, evenly divide it among the 12 tartlets. Bake 8 to 10 minutes until edges are brown. Makes 12 servings.

Fresh, novel mushroom tartlets destined to be star appetizers at a buffet table

I must have been a tartlet-a-phobe. Something kept me apprehensive about trying a new recipe for Mushroom Tartlets. Intriguing, but I didn’t see how they possibly could work. The recipe, which I kept shoving further and further back into my file, called for wonton wrappers as the base of the tartlet. Other than my Asian Spring Salad that I blogged about some days ago, I’d hardly ever cooked Asian. Where would I go in a grocery store to find the wrappers? How would a mixture such as this not stick to the muffin tins and make a huge mess?

The egg was on my face when I finally mustered my courage and decided to tackle this dish, with the recipe provided by the Chickasaw Nutrition Services. They’ve never suggested a dud yet, I assured myself as I negotiated grocery aisles to look for the wontons. Not in the Oriental foods section; not in the frozen foods either. Then as I dug further, I spotted them: in the produce department near the bagged carrots and the slaw mixtures. Well, of course. They’d be near the ingredients to make spring rolls. I was thankful I had undertaken this errand myself and hadn’t sent Hubby on this expedition, or he’d be searching around the store even yet.

Making the tartlets involved preparing a simple mixture of mushrooms, onions, garlic, spices, and cream cheese. Into each sprayed muffin tin cup goes a wonton wrapper, which houses the mushroom mixture spooned into it. You simply bake the tartlets for 8 to 10 minutes until the edges are brown. Once done the baked wonton is crisp but firm and slides right out of the nonstick muffin cup. The tartlets can cool on the tray on which you plan to serve them.

These make a wonderfully tasty appetizer that is so imaginative, you can feature it being the talk of a buffet table at a party. Everyone would wonder what it was and how it was made; one bite of the mixture encased within and these tartlets would be gone in a flash. Personally I’m thinkin’ upcoming Easter luncheon myself; these would be a great side served along a chicken dish or Easter ham.

What took me so long? Why’d I wait? These fresh little bites were astounding.

Mushroom Tartlets

Cooking spray
2 cups chopped mushrooms
1/3 cup chopped onion
3 tablespoons green onion, chopped
1/2 teaspoon garlic, minced
1/8 teaspoon black pepper
1/4 teaspoon fat-free cream cheese, softened (I used Neufchatel)
12 wonton wrappers

Preheat oven to 375 degrees. In small bowl mix mushrooms, onions, garlic, and spices. Add cream cheese; mix well Spray each muffin cup with cooking spray. In each muffin cup place one wonton wrapper. Spoon 2 tablespoons of mushroom mixture into wonton cups. If you have any mixture left over, evenly divide it among the 12 tartlets. Bake 8 to 10 minutes until edges are brown. Makes 12 servings.


Wednesday, March 23, 2011

Raspberry-Topped Cookie Cups a health-attentive birthday treat

Clearly I’ve saved the best until last; the crowning dish of the recent birthday luncheon for Son-in-Law indeed was the dessert—Raspberry-Topped Cookie Cups. Nobody wanted a monster-sized, sicky-sweet cake to sit around for days-after to tempt and to add inches to the waistline. Birthday desserts, especially for the health-conscious, ought to be sweet but short—a nice blast of specialness but without the lingering guilt and leftovers.

That’s why I was thrilled to find this winsome dessert, which I first clipped from Southern Living magazine to save and bake for my granddaughter, because I thought she’d be intrigued by the mini-treat featuring a tiny scoop of ice cream (we used Blue Bell Sugar-Free Vanilla) in the top. Then, as I concentrated on it, I thought that placing a set of the dessert cups on a tray and removing one of the raspberries to add a candle would be a darling birthday idea. So Son-in-Law got to be the first recipient.

The base of the dessert was formed in 24 no-stick mini-muffin cups sprayed with cooking spray to prevent sticking. Into the cups the cook presses about one tablespoon of refrigerated cookie dough and bakes until the dough is brown. Pressing down with a spoon handle makes the indentation to hold the goodies. Once cooled the cup is removed and the rim dipped in melted chocolate chips and those healthy Mighty-Mites, chopped walnuts. Each cup then gets 1/2 teaspoon sugar-free red raspberry jam, followed by a tablespoon of sugar-free ice cream, and a fresh raspberry on the tippy-top. Wonderful plan! A blast of sweetness (after all, it’s a birthday celebration) that occurs in miniature. Any leftovers could just be stored in the freezing compartment of the refrigerator.

Obviously I'm not the only person who thought this was a dandy dessert. The originator of the recipe, a cook named Sue Compton from Delanco, NJ, parlayed it to win the grand prize in the 2010 Pillsbury Bake-Off Contest, Southern Living reported.

Don’t do what I did—leave the ice-cream pint sitting out on the counter while the early part of the dinner was served. I thought this would make the ice cream more malleable at dessert time so that it more easily would spoon into the cookie cups. Bad idea! It was too melty. I stuffed it into the cups fast, but it was, shall we say, on the run. Son-in-Law was highly forgiving and was only too happy to down the muffin cup speedily after he blew out his birthday candle.

Nobody at the table could believe how may ways this birthday treat could be tweaked to be health-attentive.

Raspberry-Topped Cookie Cups

1 package (16-ounce) refrigerated sugar-cookie dough
4 teaspoons sugar (or sugar substitute-I use Splenda brand)
1/3 cup walnuts, finely chopped
1/2 cup semi-sweet chocolate chips
1/4 cup sugar-free red raspberry jam
1 1/2 cups sugar-free vanilla ice cream, softened
24 fresh raspberries

Heat oven to 350 degrees. Spray 24 mini-muffin cups with cooking spray. Place 1 cookie-dough round (about 1 tablespoon of dough formed into a round) into each muffin cup. Bake 15 to 20 minutes or until dough is golden brown. Place 2 teaspoons of the sugar in small bowl. Dip into the sugar the end of the wooden spoon handle. Carefully press handle into center of each cookie to make 1-inch-wide indentation. Cool cookie cup completely in pan, about 20 minutes. Meanwhile in small bowl mix walnuts and remaining 2 teaspoons sugar; set aside. In small microwavable bowl microwave chocolate chips uncovered on high 30 seconds; stir, then microwave 30 more seconds until smooth. Run knife around edges of cookie cups to loosen; gently remove from pan. Dip rim of each cup into melted chocolate and then into walnut mixture. Place walnut side up on cookie sheet with sides. In another small microwavable bowl microwave jam uncovered on high about 15 seconds until melted. Spoon 1/2 teaspoon jam into each cup. Freeze cups about 5 minutes or until chocolate is set. Using measuring tablespoon spoon ice cream into cups. Top each cup with fresh raspberry; serve immediately. Makes 24 tartlets.


Tuesday, March 22, 2011

Veggie-laden Shepherd’s Pie, with its Cheddar topping, makes a dream entree

The classic Irish dish Shepherd’s Pie, filled with all kinds of wholesome veggies and a can’t-beat Cheddar-potato topping, was an easy selection for the entree at Son-in-Law’s birthday lunch recently. Yesterday I mentioned the Southwest Skillet Corn and Zucchini that was our side dish for this birthday observance. Since Son-in-Law favors meat and potatoes and celebrates his Irish heritage, this recipe that graced the Internet as marthastewart.com recently made its St. Patrick’s Day suggestions was a perfect choice. The website marthastewart.com called the dish “happily simple”; Martha was right on that one.

Other than the veggies, the best thing about Shepherd’s Pie is that it covers lots of bases with one entree. Fluffy, golden-brown whipped potatoes, with Cheddar cheese stirred in, top the layer of meat (I subbed beef with ground turkey), carrots, celery, onion, and tomato paste. Only thing that would have made it a little better is if I had remembered to add the salt (or salt substitute) and pepper to the potatoes before I baked it. Oh, well, Son-in-Law is accustomed to having to pour salt from his shaker on anything he ingests when he dines at our place, since we’ve sworn off salt since long before he was part of our family.

One the highlights of his birthday lunch is that it marked the first time that Grandmunchkin was grown-up enough to sit at his highchair at the dining table while the rest of the family observed a proper meal. A bottle for him while the rest of the guests dined on Cheddar-Topped Shepherd’s Pie, but he’ll be spooning some out of his baby dish before too many more luncheons go by.

Cheddar-Topped Shepherd’s Pie

2 pounds baking potatoes (about 4), peeled and thinly sliced
1 tablespoon vegetable oil
6 medium carrots, halved lengthwise, quartered if large, and thinly sliced
6 celery stalks, thinly sliced
1 large onion, chopped
1/2 teaspoon dried thyme
1/4 cup all-purpose flour
1/4 cup tomato paste
salt (or salt substitute) and pepper to taste
2 pounds ground-beef chuck (or ground turkey)
1 cup skim milk
1 1/2 cups shredded Cheddar cheese (6 ounces)

Preheat oven to 450. Place potatoes in a large saucepan; cover by 1 inch with water. Bring to a boil; reduce to a simmer. Cook until potatoes are easily pierced with the tip of a paring knife, 15 to 20 minutes. Meanwhile heat oil in a 5-quart Dutch oven or heavy pot over medium-high. Add carrots, celery, onion, and thyme. Cook, stirring occasionally, until vegetables are tender, 8 to 10 minutes. Add flour and tomato paste; cook, stirring, for 1 minute. Add beef; cook, stirring occasionally, until meat no longer is pink, 6 to 8 minutes. Add 1 cup water; bring to a boil, and simmer 1 minute. Set filling aside. Drain potatoes; return to pan. Cook over medium heat, stirring, until all liquid has evaporated and a thin film covers bottom of pan, about 1 minute. Remove pan from heat; add milk and 1 cup cheese. Mash until smooth; season potato topping with salt and pepper. Pour beef filling into a 13-by-9-inch baking dish. Drop dollops of topping over filling; use a spatula to spread to edges. Using a fork make decorative peaks; sprinkle with remaining 1/2 cup cheese. Bake until topping is browned and filling is bubbling rapidly, about 20 minutes. (If topping and filling were chilled, increase cooking time to 35 minutes). Let stand 5 minutes before serving. Makes 8 servings.


Monday, March 21, 2011

Southwest Skillet Corn and Zucchini makes wearin'-o-the-green a multicultural event

Son-in-law’s birthday lunch time had rolled around; of course something Irish had to be at the top of the menu list. With a birthday just two days after St. Patrick’s Day and with an Irish family heritage, son-in-law would always and forever be linked with the wearin’-o-the-green (his signature color, by the way). So without a doubt the legendary Irish recipe, Shepherd’s Pie, had to be the entree of choice. (I’ll blog about that recipe tomorrow.)

To make it a muticultural event, however (his wife did happen to be a Spanish scholar), I added a few dishes of other ethnic origins. Southwest Skillet Corn and Zucchini was a form of the Latin dish Calabacitas that I found while I performed an Internet search for something to create using fresh corn off the cob (www.seriouseats.com yielded this recipe for me). This dish almost outranked the wow! birthday dessert (to be featured later this week as well) in terms of popularity.

Southwest Skillet Corn and Zucchini involved sauteing the fresh corn, sliced zucchini, and chopped onion in a small amount of olive oil in a skillet over medium heat until the veggies started to brown. I added green chilies and garlic powder and then poured in 5 ounces chicken broth (either canned low-sodium broth or homemade). I simmered until the veggies were tender and then covered all with shredded cheese.

This made a dandy side dish that was colorful and flavorful and fresh-tasting. As I write this, I look toward my burgeoning early spring garden and envision the now-level brown dirt spot that’s been reserved for the corn ears. Before too many weeks we’ll be picking our own fresh corn ears when we want to replicate this winner of a birthday-lunch dish. Hooray!

Southwestern Skillet Corn and Zucchini

8 ears fresh corn
2 small zucchini, chopped
1 small onion, cut up
1 tablespoon olive oil
1/2 teaspoon garlic powder
green chilies to taste (I used 1 tablespoon)
5 ounces chicken broth
salt (or salt substitute) and pepper to taste
3/4 cup grated Cheddar cheese

Steam corn until almost done; cut kernels from cob. In medium skillet heat olive oil; add corn kernels, zucchini, and onion. Cook until onion is translucent and veggies start to brown. Add garlic powder, green chilies, chicken broth, salt, and pepper. Simmer until vegetables are tender but firm, about 15 minutes, and liquid is almost evaporated. Top with grated cheese. (Just before I spread on the grated cheese, I transferred the veggies into a serving dish.) Makes 6 servings.


Friday, March 18, 2011

March Madness a little less crazy while downing this smooth, healthy chili

It originally was designed to accompany football-watching during the Super Bowl, but hey! Our team's hard-charging right now in March Madness, so Super Bowl-oriented chili seems mighty perfect to accompany the Lady Bears’ climb to success.

Southern Living premiered “Game Day” Chili back in January when everyone was settling in to watch the Game of Games early the next month. This chili recipe is totally fabulous—probably the best, and most healthy, I’ve ever eaten. So now we have it on hand to warm us while the Baylor women continue their progress through the NCAA basketball tournament as the number-1 seed! Go Lady Bears! You’re amazing! So is this chili.

Into 2 pounds of ground turkey go some fresh onions (from our garden) and cloves. Add no-salt-added tomato sauce, tomato paste, chopped fresh tomatoes, beef broth (I make mine from scratch) and two cans of pinto beans, drained and rinsed throughly (a thorough rinse removes much of the sodium content therein). The recipe calls for a 4.5-ounce can of chopped green chilies, undrained. I adapted mine to use only half the can’s contents and saved the remainder; that amount made the chili plenty spicy for me.

This recipe makes a huge amount (even better the next day and the next and the next), so I anticipate we’ll still have plenty on hand for Sunday when the Lady Bears face 16th-seeded Prairie View A&M women’s team. Watching Baylor’s Britney Griner glide smoothly across the court is like watching poetry in motion. Downing this smooth, perfect chili has a certain lyrical quality about it as well. If you try it, you’ll see what I mean.

Game Day Chili

2 pound ground turkey
1 medium onion, chopped
3 to 4 garlic clove, minced
2 tablespoons chili powder
2 teaspoons ground cumin
t teaspoons ground red pepper
1 teaspoon paprika
1 (6-ounce) can tomato paste
2 (14.5-ounce) cans low-sodium beef broth (or make your own)
2 large tomatoes, chopped
2 (15-ounce) cans pinto beans, drained and rinsed
1 (4.5-ounce) can chopped green chilies, undrained
1 tablespoon Worcestershire sauce

Cook first 3 ingredients in a 5- to 6-quart Dutch oven over medium heat. Stir occasionally, 8 to 10 minutes, or until meat crumbles and no longer is pink. Drain well; return to Dutch oven. Add chili powder and next 3 ingredients; cook 1 minute. Add tomato paste and tomatoes and cook 1 minute. Add remaining ingredients. Bring to a boil. Cover, reduce heat to low, and simmer 2 hours. makes 8 to 10 servings.


Thursday, March 17, 2011

Unlikely combo of leeks and salmon makes a hearty soup that kicks off Physical Exam 2012 prep

My fascination with leeks began last month when I began using them in such recipes as the ones for Fresh Mushroom Burger Topping and Fiesta Green Beans. I discovered how much flavor this oversized version of a green onion can bring to a mixture. I couldn’t believe how piquant a recipe became with the addition of one simple fresh veggie item.

Once I ventured into leek-ville, then, recipes that feature them began cropping up all over the place. A recipe for Leek and Salmon Soup in my Celebrating a Heathy Harvest booklet just begged to be tried because it called for fresh salmon. Buoyed by my recent physical exam report that showed a drop in my cholesterol reading from one year ago, I was eager to keep up the intake of such omega-3 foods as salmon and other fish, nuts, and oatmeal so I could already start the countdown to next year's physical and an even better report. So the soup that combined leeks with cholesterol-lowering salmon seemed as though it was a good idea. Potatoes, with their skins on, also went into the mixture, thus guaranteeing some fiber.

Unlike a lot of soups, this one was a quick-fix and could be served instantly (although, as with many mixtures, it became even more flavorful as it settled in overnight.) Only one step even slightly complicated it: the requirement to remove half the vegetables and puree them in a blender or food processor before returning them to the soup and reheating. However, that pureeing step gives a nice, thick texture to the soup; adding low-fat evaporated milk makes it creamy. Salmon and leeks together made for a nice combination.

Hubby gave Leek and Salmon Soup an A-plus; when I arrived home from babysitting our little grandmunchkin earlier this week, he already had the kettle out and had it warming on the stove, he was so eager to try it again. Physical Exam 2012, I’m already prepping for you by chowing down fish, fish, and more fish, along with my healthy "5 to 9".

Leek and Salmon Soup

1 tablespoon olive oil
1 large onion, finely chopped
3 large leeks, including green parts
2 potatoes, diced, skins on
2 cups low-sodium vegetable broth
3 cups water
1 bay leaf
1 1/4 cup fresh salmon, cooked, drained
1/2 cup low-fat evaporated milk
salt (or salt substitute) and pepper to taste

Remove the leeks’ outer leaves, wash, and cut into think slices. In a kettle over medium heat, heat the oil. Add onion and leeks; cook until softened, about 4 minutes. Add the potato, broth, water, and bay leaf. Simmer until vegetables are tender, about 15 minutes; remove bay leaf. Remove half the vegetables and puree them; return them to the soup; reheat. Add the salmon to the soup. Cook about 5 minutes. Add evaporated milk; serve.


Wednesday, March 16, 2011

Simple, warm, healthy . . . this breakfast compote contains the "nearly perfect" fruit

Precious little will get Hubby to deviate from his weekday-morning breakfast fare. Without a doubt he always serves himself a bowl of warm oatmeal topped with fresh blueberries and a few scoops of nonfat plain yogurt. No problem with that selection—perfectly healthy on all accounts.

Yesterday when I tried to lure him away with a special concoction, I have to admit that at first, he seemed a little skeptical. He WANTED his oatmeal with berries and yogurt.

When I rounded the corner carrying the clear parfait glasses filled with the mouth-watering compote you see photographed here, however, he practically jumped for joy. All morning traditions were forgotten as he admired this breakfast offering.

Into the glasses had gone a wondrous mixture of chopped apples and oranges with cinnamon stirred in and warmed in the microwave. On top of that went a couple of tablespoons of yogurt crowned with a smattering of walnuts. (Ah, walnuts! They're the talk of the town. In Prevention magazine, health blogs, everywhere . . . walnuts are tub-thumped for their health properties.) Hubby was charmed.

The idea for this Quick Apple-Orange Fruit Compote sprang from the pages of our nightly reading—a book called Food Remedies. Late evenings find us in our living room noting to each other various nuggets of wisdom from this book, published by Prevention. (How's that for a pre-bedtime preoccupation?) One gem that caught my eye was a comment about citrus. The book stated that if one ate at least seven navel oranges a day, his or her cholesterol level would drop by at least 20 points! What a captivating idea, but what a lot of oranges!

The orange, however, is billed as nearly the perfect fruit. Not only is it high in vitamin C and fiber, it also is packed with antioxidants--help for the heart. The limonene found in oranges can help block certain cancers. Don't shy away from the pulp however, the health experts say. One dietitian writing for our Food Remedies book says she adds oranges wedges to salads, on top of stir-fry dishes, and just about everything.

Such is the health trivia that occupies the evenings of Hubby and me. A romantic duo, aren’t we? But if swapping health factoids and acting on them can add a few extra days to our lives, that's a few more days we may have to enjoy each other’s company on earth.

Quick Apple-Orange Compote

1 Granny Smith apple, cored and chopped
1 navel orange, peeled and chopped
1 teaspoon ground cinnamon
1/2 cup fat-free vanilla yogurt
2 tablespoons broken pecan or walnut pieces

In a medium microwave bowl, combine the apple, orange, and cinnamon. Cover with plastic wrap and microwave on high for 4 minutes or until the fruit is hot and soft. Divide among 2 bowls or parfait glasses; spoon and divide the yogurt evenly over each. Sprinkle with the nuts; serve warm. Makes 2 servings.


Tuesday, March 15, 2011

Artichoke dip makes a heart-healthy contribution while it serves up as a great, warm snack

The odd-looking artichoke, with its prickly leaves that must be negotiated before one can appreciate its beauty and commendable flavor, got some good press recently when Prevention magazine named it as Superfood for the month of April.

Artichokes obtained recognition because they are about to be at their peak season during May (though available year-around). The magazine touted them because they supply heart-healthy fiber, folate, and antioxidants. It noted that in a medium cooked artichoke a person can obtain 41 percent of the daily goal for fiber that someone needs.

Great news, because I had an artichoke recipe I had been dying to try since I first saw it amidst a bunch of Superbowl-suggested recipes in February. It combined artichoke hearts, cooked shrimp, and garlic, along with mayo and shredded Parmesan cheese, for a warm dip that could be serve with veggies, pita bread, breadsticks, or chips. (We also learned that Warm Artichoke Shrimp Dip, from Southern Living, served up just as good cold—straight from the fridge. But on the early spring weekend day in which we sat on our deck near the lake and rested from our spring RV cleaning that I mentioned in yesterday’s blog, that warm dip with chips was mighty motivating.)

I certainly can understand how this recipe would be the star of the appetizer table if served at a gathering of friends. But it was a cozy conversation piece for just the two of us as well. Who would have ever thought that the humble artichoke was the source of all this healthy, delicious goodness?

Warm Artichoke Shrimp Dip

2 (14-ounce) cans artichoke hearts, rinsed thoroughly, drained, and chopped
1 cup freshly grated Parmesan cheese
3/4 cup lite mayonnaise
1/2 cup fine, dry whole-wheat breadcrumbs
2 garlic cloves, minced
2 tablespoons lemon juice
1/2 pound peeled, cooked shrimp, chopped
garnishes: lemon zest, peeled, cooked shrimp

In large saucepan combine artichoke hearts and next 5 ingredients. Cook over medium heat; stir often, 4 to 5 minutes or until mixture is thoroughly heated. Stir in shrimp. Transfer to a serving bowl. Garnish, if desired. Serve with pita crackers, breadsticks, chips, or veggies. Makes about 4 cups of dip. You can serve half the dip first and keep the remaining half warm in saucepan.


Monday, March 14, 2011

With "spring" in the title, recipe just has to bring about something good

The title that included the magic word “spring” couldn't help draw me to the recipe. I mean, who can avoid getting spring fever on these recently gorgeous days we've experienced in our part of the Long Star State? Any food item that seems to move us a little further along in the leave-taking of winter just has to be yummy, I reckoned.

Crunchy Asian Spring Salad was just that. Colorful, healthy, different, but beyond all that, it used two green onions from our soon-to-be garden. Onion shoots stand like green sentinels above the soil as we gaze out the patio door onto our little spot of nature. Some day soon, the growth beneath the ground will be bulbous and ready to keep us in onions throughout the summer. For now, though, we pluck a few of the startlings to spice up this tasty spectacle of color and health.

The light toasted sesame dressing was a wonderful pull-together for this assorted veggie toss. Chow mein noodles added the crunch. This weekend hubby and I enjoyed this springtime feast as we sat on the deck of our outdoor living area attached to our RV at the lake. We took a lunch break from spring-cleaning the RV and its environs and marveled that time for these spring-prep errands had rolled around again. Boy, were we ready to sit outdoors and bask in the breeze from the lake—while we dined on this splendid accompaniment.

Crunchy Asian Spring Salad

4 cups spinach leaves, torn
1 red bell pepper, cut into thin strips
1 cup carrots, cut into thin matchsticks
2 green onions, chopped
2 cups red cabbage, roughly chopped
1 cup snow peas, halved
1/2 cup Asian toasted sesame dressing, light
1/2 cup chow mein noodles

In a large bowl combine first six ingredients. Add dressing and toss to coat. Top with chow mein noodles. Chill until ready to serve. Makes 8 1-cup servings.


Friday, March 11, 2011

Celebrating a great annual physical report with this healthy bean-and-spinach skillet meal

The results are in, and healthy eating won big! Residing in my in-box yesterday were the results of my bloodwork from my physical exam two days ago. My squeals of satisfaction could be heard all the way to downtown Dallas as I read that my triglycerides were down six points from last year, my bad cholesterol also was down six, and my good cholesterol was up eight (UP is good, in this case). All other results (including blood pressure and weight) were excellent throughout, the doctor reported in his email to me. Something truly to be thankful for, since in the gently aging, such as myself, those readings often go the opposite direction. HOORAY! I credit it all to (besides the Good Lord, of course) dietary changes. Maybe I should credit The Newfangled Country Gardener, since writing this blog keeps me honest about my food choices. Fruits, vegetables, fiber—tweaking the diet with a healthy eating plan—does deliver what it promises.

To celebrate I prepared a recipe I’ve been holding onto from HealthMonitor, the little magazine that our local hospital mails out to the community. (Recipes also can be found at www.HealthMonitor.com.) Like the previous night’s, it was another skillet meal; the contents were absolutely scrumptious; one serving amounted to only 327 calories. (HealthMonitor stated that it reprinted the recipe from the book, EatingWell 500-Calorie Dinners by Jessie Price, Nicci Micco, and the editors of EatingWell Magazine.) White beans, tomatoes, and spinach leaves poured in the health on top of the shelf-stable gnocchi (soft dumplings). A mixture of two cheese on top was the crowning touch to this good recipe.

Is bypassing the fast-food lines and taking time to put healthy food on the table worth it all? You betcha, when the Moment of Truth time arrives and the annual-physical report turns up good in the inbox!

Skillet Gnocchi with Spinach and White Beans

1 tablespoon plus 1 teaspoon extra-virgin olive oil, divided
1 (16-ounce) package shelf-stable gnocchi
1 medium yellow onion, thinly sliced
4 cloves garlic, minced
1/2 cup water
6 cups spinach, chopped
1 (15-ounce) can diced tomatoes (or 2 1/2 cups chopped Roma tomatoes)
1 tablespoon Italian seasoning
1 (15-ounce) can white beans, rinsed
1/4 teaspoon pepper
1/2 cup part-skim mozzarella cheese, shredded
1/4 cup Parmesan cheese, finely shredded

In a large nonstick skillet over medium heat, heat 1 tablespoon oil. Add gnocchi and cook, stirring often, until gnocchi is plumped and starting to brown, about 5 to 7 minutes. Transfer to a bowl. Add the remaining teaspoon of oil and chopped onion to the pan; cook over medium heat, stirring, for 2 minutes. Stir in garlic and water. Cover and cook until the onion is soft, 4 to 6 minutes. Add spinach and cook, stirring, until spinach starts to wilt, about 1 to 2 minutes. Stir in tomatoes, beans, and pepper and bring to a simmer. Stir in the gnocchi and sprinkle with mozzarella and Parmesan. Cover and cook until the cheese is melted and the sauce is bubbling, about 3 minutes more. Makes 6 servings.


Thursday, March 10, 2011

Funky salad recipe using fresh pineapple boosts magnesium for bone health

With the shrimp I had left over from my Big-Easy Gumbo, prepared yesterday in anticipation of my annual physical, I was fortunate to find another really funky recipe that would enable me to use up all my purchased shrimp.

The March 2011 issue of Prevention magazine featured pineapple as its superfood. Fresh pineapple was cited as being full of nutrients as well as flavor. Besides supplying vitamin C, a cup of pineapple contains one’s daily quota of magnesium, a trace mineral that promotes bone health. Though available all year around, this tropical fruit is at its peak from March through June.

One of Prevention’s fast-idea recipes featuring pineapple was Warm Shrimp and Pineapple Salad, prepared in a skillet. Into the skillet go blackeyed peas, green peas, chopped red bell pepper, shrimp, and pineapple, along with some seasonings. In almost no time this wonderful skillet supper appeared before my eyes (quick if the pineapple already is cut up, of course). It used up my left-over shrimp, it gave me daily requirement of manganese (hooray for bone health. I'm waiting for the report on that aspect of my physical exam as well), and it made Hubby’s eyes pop out when he saw what a colorful and healthy supper dish was arrayed before him.

While we dined on this concoction, we both commented how good Warm Shrimp and Pineapple Salad also would be served cold. Pineapple, shrimp, peas, red pepper all would be good as cold-salad ingredients as well. We’ll find out when we serve it for lunch today. I won't have to talk Hubby into that proposal; he LOVED the dish and was eager to dine on it again.

Warm Shrimp and Pineapple Salad

1 (16-ounce) package frozen black-eyed peas (about 3 3/4 cups)
1 1/4 cup frozen green peas
1/2 red bell pepper, chopped
1 tablespoon olive oil
1 teaspoon paprika
1/2 teaspoon salt (or salt substitute)
1 pound large shrimp, peeled and cooked
1 1/3 cups chopped pineapple
2 teaspoons lime juice
1/8 teaspoon hot-pepper sauce
1/3 cup fresh basil leaves, chopped (or 1 1/2 tablespoons dried basil)

In large skillet combine black-eyed peas, green peas, bell pepper, oil, paprika, and salt. Cook over medium-high heat for 4 minutes. Add shrimp and cook until mixture is heated through—about 2 minutes. Toss in remaining ingredients. Season to taste with salt and pepper. Makes 4 servings.


Wednesday, March 9, 2011

Will Omega-3's in this recipe bring good exam results? If they don't, at least the black-eyed peas will bring good luck.

The day was two months away, then the day was two weeks away, then the day was two days away, then the day was tomorrow. The day was the date for my annual physical with my G.P. It was The Moment of Truth. No matter how much I repeat the phrase, “I’m in terrific health; I’m in terrific health”, I was about to encounter the one I couldn’t fool, even with my mantras. My G.P. (after a little blood-letting, of course) would know the numbers. He’d tell me whether all my efforts during the past year had paid off.

What to eat the night before my annual physical exam? (a meal, of course, which would be my last food to ingest before my fast began—necessary for accurate bloodwork). Only one solution to that, of course—fish and more fish. I wanted those bad-cholesterol numbers in the bloodwork to be as low as possible. Just a little more fish, after consuming it and nuts and oatmeal and fish-oil tablets all year, would never hurt.

Actually, I couldn’t help be a tad excited about this necessary evil, the annual exam. It would be my first checkup since I became a runner 15 months ago and since we began Hubby’s Extreme Healthy Eating Plan, prompted by his uncomplimentary bloodwork in November 2009. Last year’s physical occurred after I had only about three months of our new-world order under my belt. This year’s would be the first to reflect a whole 12 months of running and major outrageous eating.

My “last supper” featured my Big Easy Gumbo recipe from Southern Living. Lots of sweet onion, green bell pepper, and celery went into the stock pot; fiberific black-eyed peas, cooked chicken, turkey sausage, and the seafood element—shrimp, all served over brown rice. This hearty Creole gumbo was super-filling and would tide me over until after I could break my fast with a late-breakfast after the exam. (Years ago I learned to book the earliest-possible appointment time so I could resume eating as quickly as possible.)

Back to the recipe. Hubby and I just loved the Gumbo. The minced garlic and salt-free seasoning were just enough to spice up the mixture. The recipe made enough for dining before 10 pre-doctor’s visits. Hopefully that last boost of Omega-3’s from the fish will put me over the top for a good report.

I may well file this recipe under my New-Year’s Day recipe section since it features black-eyed peas. Looks to me as though it would make a good lucky ticket for a new year. We’ll see if it was my lucky ticket for a successful annual exam.

“Big Easy” Gumbo

1/2 cup peanut oil
1/2 cup all-purpose flour
1 cup chopped sweet onion
1 cup chopped green bell pepper
1 cup chopped celery
2 teaspoons salt-free Creole seasoning
2 teaspoons minced garlic
3 (14-ounce) cans low-sodium chicken broth
4 cups shredded cooked chicken
1/2 pound turkey sausage, cut into 1/4-inch-thick slices
1 1/2 cups frozen black-eyed peas, thawed
1 pound peeled, large raw shrimp (16/20 count)

Heat oil in a large Dutch oven over medium-high heat; gradually whisk in flour and cook, whisking constantly, 5 to 7 minutes, or until flour is chocolate-colored. (Do not burn mixture.) Reduce heat to medium. Stir in onion and next 4 ingredients and cook, stirring constantly, 3 minutes. Gradually stir in chicken broth; add chicken and next 2 ingredients. Increase heat to medium-high and bring mixture to boil. Reduce heat to low and simmer, stirring occasionally, 20 minutes. Add shrimp and cook 5 minutes or just until shrimp turn pink. Makes 8 to 10 servings.


Tuesday, March 8, 2011

No more teasing about a funny-sounding ingredient; Mediterranean Salad's power-packed

I doubt that I’m the only person that has succumbed to doing a “sounds-like” on bulgur’s funny name. When I first saw the title of Citrus Bulgur Salad about which I blogged some weeks ago, I couldn’t help myself—it just “sounded like” Citrus Vulgar Salad to me. I mean, who eats bulgur on a regular basis? Certainly not me—that is before I became a fan.

Well, no longer do I get anywhere close to tee-heeing about bulgur being “vulgar”. Citrus Bulgur Salad brought lots of accolades, including mine. So recently when Southern Living (in that same marvelous issue that spawned yesterday’s Praline Pecan French Toast) featured Mediterranean Chicken Salad that had bulgur as one of its chief ingredients, I yanked that recipe up quickly and had to try it.

The bulgur wheat, with its mild, nutty flavor, gets prepared in the same way one might prepare rice on the stovetop: two cups of water to one cup of bulgur; boil, reduce heat, simmer for 20 minutes or until tender. Into that mixture, once cooled, goes all kinds of good garden stuff: chopped tomatoes, cucumber, red onion, fresh parsley. Toss in cooked chicken, feta cheese, garlic, salt substitute, and fat-free Italian dressing. Chill a little while or serve immediately over spinach or Bibb lettuce. (Remember that bulgur’s main redeeming quality is that it’s a great source of dietary fiber and protein. As I mentioned earlier, just a single portion of bulgur provides nearly all of the daily requirement for whole-grain foods.)

Well, this salad recipe made oodles and oodles; we’ll be sorry to see it finally disappear from the jumbo salad bowl. Hubby uses this appellation a lot: “best salad ever”, but in this case, I think he may be right for all-times.

Mediterranean Chicken Salad

2 cups boiling water
1 cup uncooked bulgur wheat
1 1/2 teaspoon salt, divided (or salt substitute)
3 cups chopped cooked chicken
1 cup grape tomatoes, halved
2 garlic cloves, pressed
3/4 cup chopped fresh parsley
1/2 cup bottled fat-free Italian dressing
1/4 cup finely chopped red onion
1 (4-ounce) package crumbled feta cheese
1 medium cucumber, peeled and chopped
1 head Bibb lettuce or spinach leaves

Combine boiling water, bulgur wheat, and 1 teaspoon salt substitute. Cover and allow to simmer for 20 minutes or until bulgur is tender. Drain and rinse with cold water. Allow to cool slightly. Combine bulgur wheat, chicken, next 7 ingredients, and remaining 1/2 teaspoon salt substitute. Serve over greens. Makes 6 servings.


Monday, March 7, 2011

Oodles of syrupy pecans get weekend morning moving with this delectable French toast

This past Saturday morning called for a power breakfast that was needed to keep us pumped for a LO-O-O-O-NG day of errands. Time away to visit son and family out West had been terrific, but now we were back to get-serious time in terms of putting our lives here back in order.

Part of that re-entry involved catching up on those unavoidable tasks that pile up when we’re out of pocket. Wal-Mart, grocery, a little pre-Easter prep, etc., all awaited; some of those required Hubby’s presence. Fortify him well, I reasoned, so he’s a willing accomplice to all the “Honey-Do”s that lie ahead.

After the breakfast I hatched up, Hubby might well have been primed to say yes to diamonds and pearls (I didn’t try, mind you, but I could have.) Breakfast consisted of none other than a dish temptingly titled Praline-Pecan French Toast, adapted from a recipe out of a recent Southern Living magazine that featured old Southern standbys with a new twist. The recipe’s tagline read, “A short-order breakfast special gets an easy hands-off finish in the oven.”

I have to admit, this dish doesn’t look very promising when it’s baking. I had to keep peeking at it through the oven-door window and kept murmuring, “Southern Living, I don’t know about this . . ..” From top-side up it simply resembled a bunch of wheat-bread scraps stirred around in a bread bag and shaken out into a 13-inch-by-9-inch glass pan.

After I pulled the baked item from the oven, however, I turned the bread slices onto a dish with their bottom sides flipped over. During the cooking the bread had been baking in a pool of melted butter, brown sugar, sugar-free maple syrup, and broken pecans. Overnight the bread had soaked in a mixture of egg substitute, skim milk, sugar, cinnamon, and vanilla. Once turned out onto its serving dish the pecan mixture in which it had baked became a crumbly, golden, nut topping that crowned the browned French toast. The broken nuts, saved from a previous pecan harvest from our pecan trees, had cooked up crisp and sweet. I sprinkled on a little powdered sugar, a requisite for any French toast. Then I summoned Hubby for the breakfast of his dreams.

Not one extra dab of syrup was needed for this breakfast delight, fit for a king (or the king of my house, anyway). Sure did make the errands that stretched out ahead look an awful lot sweeter.

Praline-Pecan French Toast

8-10 torn slices (day-old) whole-wheat bread
1 cup firmly packed brown sugar (or brown-sugar substitute)
1/3 cup butter, melted
2 tablespoons sugar-free maple syrup
3/4 cup chopped pecans
4 large eggs (or 1 cup egg substitute, lightly beaten)
1 cup skim milk
2 tablespoons granulated sugar (or sugar substitute)
1 teaspoon ground cinnamon
1 teaspoon vanilla

Stir together brown sugar and next two ingredients; pour into a lightly greased 13-inch-by-9-inch glass baking dish. Sprinkle broken pecans over brown-sugar mixture in baking dish. Whisk together eggs and next 4 ingredients. Arrange torn bread pieces over pecans; pour egg mixture over bread. Cover with plastic wrap and chill 8 hours or overnight. Preheat oven to 350 degrees. Bake bread 35 to 37 minutes or until golden brown. Turn out, pecan-side up, into individual serving dishes. Sprinkle with powdered sugar. Serve immediately. Makes 8 to 10 servings.


Friday, March 4, 2011

Line up all this green for St. Paddy’s Day, just around the corner

Nobody in our part of Texas really believes that winter won’t trick us with another sneak blast before we can kiss Jack Frost goodbye permanently. Rumblings yesterday at Roach Feed & Seed, Garland’s local supplier of gardening goods and advice, were that before the end of the month, a last bad freeze likely is due in. I peek out my back door at the burgeoning lettuce leaves struggling to keep their heads above the garden soil and wonder whether they can be survivors through another round of Arctic Attack.

While I wait for nature’s bounty from my own garden, I still have a partial bag of romaine lettuce left over from Three-Leaf Salad, the Wonder Salad I blogged about earlier in the week. Time for Lemony Lettuce, a second dressed-up lettuce recipe across the page from Three-Leaf Salad in my “Celebrating a Healthy Harvest” cookbooklet.

Talk about a tangy dressing that just makes the dish! The lemon-oil-and-vinegar, spiked with ground mustard, salt, and pepper, brings those lettuce leaves to life. As with the mundane-looking Three-Leaf Salad that ultimately got rave reviews, Lemony Lettuce amazes with its understated potential for being the most talked-about item on a buffet table.

With all this healthy green, I’m thinkin', line this recipe up for St. Paddy’s Day, which, after all, is just around the corner.


Lemony Lettuce

1 large head romaine lettuce
1 avocado, peeled, cut up into chunks
2 tablespoons olive oil
2 tablespoons lemon juice
1/2 teaspoon salt
1/2 teaspoon pepper
1/2 teaspoon mustard

Rinse romaine pieces under cold running water. Shake off excess water and dry with paper towels. Place in salad bowl. Add cut-up avocado. Combine dressing ingredients in a screw-top jar. Cover and shake well. At serving time drizzle dressing over lettuce leaves and toss.


Thursday, March 3, 2011

Bringing home the Best of the West yielded an elegant citrus delight

As I’ve blogged earlier, the recent cover story about citrus in Southern Living magazine couldn’t have appeared at a better time. There we were departing Citrus Heaven, in the Western region of this country, and toting home a bag absolutely bursting with fresh citrus we’d procured from our son’s back yard. I’ve never had the nerve to try to replicate something that magazines paid big bucks to style for their cover, but this time I couldn’t help myself. I HAD to try Elegant Citrus Tart that graced the front of this issue.

Never mind that I didn’t own a tart pan and had to use a regular pie plate for my creation. Never mind that my grapefruit and orange sections didn’t fan out exactly as perfectly as SL’s did. I went with what I had and went with my own imperfect arrangement. My version still looked dramatic and fabulous, if I do brag so myself.

The tart (or pie, in my situation) begins with a crust that’s whisked up in a food processor. It features toasted coconut, flour, and powdered sugar pulsed together, with butter and coconut flavoring added. Cold water is sprinkled in until a dough forms. The dough then is rolled out onto a floured pastry board until it’s in a round shape to fit the pie (or tart) pan.

Best to have already made the Buttery Orange Curd filling, or else you have to cool your heels. The curd, made on the stovetop as one would a pudding, has to refrigerate for 8 hours or overnight, so even though you have a perfectly browned crust now ready, if your filling hasn’t chilled properly, you have to wait a LONG time to finish the tempting treat. Beyond that, be sure to have your citrus sections already prepared, or you’ll go into another stall. Grapefruit of various varieties and orange sections must be cut out neatly from the assorted fruit. Best to drain the sections on a paper towel to eliminate extra juice before topping the curd.

Finally, however, with all the pieces ready, assembling the tart is a breeze. Atop the Buttery Orange Curd, which is atop the crust, start with the darkest grapefruit (the magazine suggests the Florida-grown Ruby Red and the Rio Star from Texas, if you don’t have access to the backyard citrus grove that we raided) in the center and work the arrangement out to the edges. Use the lighter-colored navel oranges for the rim.

This might have been designed for a dessert, but I had waited an excruciatingly long time to try this creation and would not be deterred. I finished it in the early morning hours, photographed it, and immediately carved myself a slice for breakfast. Then I promptly called for Hubby. “Life’s too short! You have to sample some of this NOW!” So he forewent his constitutional breakfast oatmeal and dove in for a treat, too.

Ohboy, ohboy, ohboy. Worth the effort of sectioning all those citrus bits. Worth the effort of waiting overnight. And healthy, healthy, healthy. You’ll see what I mean. Life’s too short not to try it soon.

Elegant Citrus Tart

1/3 cup sweetened flaked coconut
2 cups all-purpose flour
2/3 cup powdered sugar
3/4 cup cold butter, cut into pieces
1/4 teaspoon coconut extract
Buttery Orange Curd (see below)
9 assorted citrus fruits, peeled and sectioned

Preheat oven to 350 degrees. Bake coconut in a single layer in a shallow pan 4 to 5 minutes or until coconut toasted and fragrant, stirring halfway through; cool completely (about 15 minutes). Pulse coconut, flour, and powdered sugar in a food processor 3 to 4 times or until mixture is combined. Add butter and coconut extract and pulse 5 to 6 times or until crumbly. With processor running, gradually add 3 tablespoons water and process until dough forms a ball and leaves sides of bowl. Roll dough into a 10-inch circle (about 1/4-inch thick) on a lightly floured surface; press on bottom and up sides of a 9-inch round tart pan with removable bottom (or 9-inch pie pan). Trim excess dough and discard. Bake at 350 degrees for 30 minutes. Cool completely on a wire rack, about 40 minutes. Spread Buttery Orange Curd over crust. Top with citrus sections. Chill. Makes 8 servings

Buttery Orange Curd

2/3 cup sugar (or sugar substitute)
2 1/2 tablespoons cornstarch
1 1/3 cups orange juice
1 large egg, lightly beaten (or 1/4 cup egg substitute)
3 tablespoons butter
2 teaspoons orange zest
pinch of salt (or salt substitute)

Combine sugar and cornstarch in a 3-quart saucepan; gradually whisk in orange juice. Whisk in egg. Bring to a boil; continue boiling, whisking constantly, 3 to 4 minutes. Remove from heat; whisk in butter, zest, and salt. Place heavy-duty plastic wrap directly on curd (to prevent a film from forming); chill 8 hours. Pour over crust.


Wednesday, March 2, 2011

How to cook plantains? Don’t bite into them and expect a banana taste.

My hubby has been on a potassium and magnesium hunt like some people hunt buried treasure.

He’s been reading about how a boost in potassium and magnesium actually constitutes a natural way for preventing hypertension. For years, on that account we've watched the sodium content in foods.

Now the new deal seems to be boosting the body’s consumption of potassium and magnesium to keep one’s blood pressure from soaring to new heights. With Hubby many new foods (well, new to him in terms of daily intake) now regularly go down the hatch: a box of raisins a day, multiple bananas, and anything that would help lower BP via a natural means and not through medication.

His latest discovery was about plantains. In a new book, The Doctor's Book of Food Remedies,
plantains were tub-thumped as being practically a wonder-food (although they hardly taste like its look-alike cousin, a banana. Bite into a raw plantain would be like taking a bite of uncooked potato. Yuk!). One cup of sliced, cooked plantain delivers a potassium lode of 716 milligrams, or about 20 percent of the recommended daily value. Not only is it a key mineral to counteract hypertension, a potassium-rich diet reduces the risk of stoke significantly, prevents and treats ulcers, and prevents constipation.

The new book just mentioned happily includes some recipes after each food is discussed. Happily because I’d otherwise have no idea what to do with a raw plantain. Plaintains with Garlic and Thyme was the first recipe it mentioned. Hubby helped me prepare this one, since seeing is believing was his motto, too, about how this unusual dish would turn out.

I’m pleased to report a pleasant surprise. The cooked plantain (it had to be steamed first before it was stir-fried) tasted more like skillet fried potatoes than anything banana-y. It had a wonderful texture and flavor (when tossed with the recommended garlic, paprika, salt, and thyme.) Hubby said he could eat it without pouring ketchup on it (for him, a real accomplishment). I can see it served with meat loaf or other meat dishes; I also sprinkled a little grated Cheddar cheese on top because a little cheese perks up anything and adds to the color.

A final factoid about plantains: they’re reputed for strengthening the immune system. This means being able to better stave off whatever illnesses travel your way. Not a bad commendation when you realize we’re still in the midst of the flu season (Hubby and I both were laid low with the Bad Old Flu just about this time 35 years ago. It’s not a situation we want to repeat.)

Wonder food? Now I understand it. The newly concocted Plantains with Garlic and Thyme provided a truly teachable moment.

Plantains with Garlic and Thyme

2 large green plantains
2 cups water
1 1/2 teaspoons dried thyme
1 teaspoon paprika
1/4 teaspoon salt
4 teaspoons olive oil
3 cloves garlic, minced

Cut the tips off both ends of the plantains and discard. Run a knife lengthwise down a “seam” of each plantain. Peel off and discard the skin. Cut into 1/8-inch thick slices. In a large nonstick skillet, bring the water to a boil over medium heat. Add the plantains. Cover and simmer until tender, about 15 minutes. Test for doneness by inserting the tip of a sharp knife into a slice. With tongs or a slotted spoon, remove the plantains to paper towels to drain. Pour off the liquid from the skillet and wipe the skillet with paper towels. In a large bowl combine the thyme, paprika, and salt. Add the plantain slices and with your hands toss to coat. Add the oil to the skillet and heat over medium-high heat. Add the plantain slices and spread them evenly in the skillet. Cook until the plantains are golden on the bottom, 2 to 3 minutes. Turn and scatter the garlic over the plantains. Cook for another 2 to 3 minutes or until golden on the bottom. Toss gently to coat with the garlic. Makes 4 servings.


Tuesday, March 1, 2011

Thoughts of spring not far away with this Three-Leaf Salad

When we left for our Westward journey some weeks back, our part of Texas still was in the clutches of icy winter. We’ve returned to glorious spring—gorgeous, bright days, jonquils filling the flowerbeds, mild temperatures. What a transition—hooray!

On return, one of the first things we did was to inspect how the garden had fared during Jack Frost’s icy grip. The lettuce leaves that we thought might be so tender that they would succumb actually were hale and hardy. Onions seemed OK, too. Harvest days for our winter plantings may be just around the corner.

I had spotted this recipe earlier and had thought it would be a wonderful celebratory dish when we bring in our own crunchy lettuce. I couldn’t wait to try it, however, so into the salad bowl went three kinds of storebought greens. Hopefully our own will be ready for the next serving.

The ingredients were so simple, I couldn’t imagine how tasty this salad would be. But after downing one bowlful I kept going back for more. I also couldn’t help but think that this should be relegated to the Christmas-recipe section of my binder—the bright red of the pepper and the holiday green of the lettuce and spinach were Christmas colors, for sure.

But thoughts of next Christmas don’t linger around too long with these pretty springlike days that get us ready for one of the most beautiful seasons of all. Can planting our next garden be too far behind?

Three-Leaf Salad

1 head romaine lettuce
2 cups fresh spinach
1/4 head iceburg lettuce
1 large red Bell pepper, cored
3 tablespoons cooking oil
3 tablespoons vinegar
1/4 cup Cheddar cheese, grated
1 teaspoon salt (I used salt substitute)
1/2 teaspoon pepper

Rinse all greens and slice into thin shreds. Put shreds into a large salad bowl. Cut pepper lengthwise into thin strips; add to the bowl. In a small container blend oil, vinegar, salt, and pepper. Pour over salad and toss to coat. Add cheese and toss again. Serve immediately. Makes 4-6 servings.